Note: This article is written in original, web-ready American English and synthesizes practical seed-saving guidance from reputable gardening, extension, and seed preservation resources.
Introduction: Tiny Seeds, Big Garden Drama
Marigolds are the cheerful overachievers of the garden. They bloom like they have a personal contract with the sun, tolerate less-than-perfect soil, and ask for very little in return. Then, at the end of the season, they quietly hand you next year’s flower show in the form of dry, slender seeds tucked inside faded flower heads. That is gardening generosity at its finest.
Learning how to harvest and save marigold seeds is one of the easiest ways to keep your garden colorful without buying new seed packets every spring. It is also deeply satisfying. One dried marigold bloom can contain dozens of seeds, and a handful of saved flower heads can become a border, a container garden, companion plants for vegetables, or a sunny patch that makes your yard look like it has been taking vitamin D.
The process is simple: choose healthy plants, let the flower heads dry on the plant, collect the seeds, dry them thoroughly, and store them in a cool, dry place. Still, small details matter. Harvest too early and the seeds may not be mature. Store them with moisture and you may discover mold instead of marigolds. Save seeds from hybrid varieties and next year’s plants may surprise you with different colors, heights, or flower forms. Sometimes surprises are delightful; sometimes they are the garden equivalent of opening a mystery box with dirt on it.
This guide walks you through everything you need to know about harvesting marigold seeds, drying them, storing them properly, and using them next season. Whether you grow French marigolds, African marigolds, signet marigolds, or a cheerful mix from the clearance rack that somehow became your favorite, you can save seeds with confidence.
Why Save Marigold Seeds?
Saving marigold seeds is practical, economical, and just plain fun. Marigolds are annual flowers, which means they complete their life cycle in one growing season. They sprout, grow, bloom, produce seeds, and eventually fade. When you collect those seeds, you are preserving part of that cycle and carrying it into the next growing year.
You Save Money
A single seed packet is not usually expensive, but gardeners have a special talent for buying “just one more” packet until the seed drawer looks like a botanical library. Saving your own marigold seeds gives you a free supply for next season. If your plants performed well, that is not just free seed; it is seed from flowers already proven in your garden’s soil, light, and weather.
You Keep Favorite Flowers Going
Maybe one marigold had the perfect golden-orange bloom. Maybe another stayed compact and tidy along the walkway. Maybe a row of marigolds stood guard by the tomatoes like tiny floral security officers. Saving seed from your healthiest and best-looking plants helps you continue the traits you enjoyed most.
You Learn How Plants Work
Seed saving turns gardeners into better observers. You begin noticing when blooms fade, how seed heads mature, which plants resist disease, and which flowers keep producing after summer heat. It is low-pressure science with more butterflies and fewer lab coats.
Know Your Marigolds Before Saving Seeds
Most gardeners use the word “marigold” for plants in the Tagetes genus, including French marigolds, African marigolds, and signet marigolds. These are the common bedding marigolds found in garden centers across the United States. Calendula is sometimes called “pot marigold,” but it is a different plant. Calendula seeds look different, and the harvesting process is not quite the same.
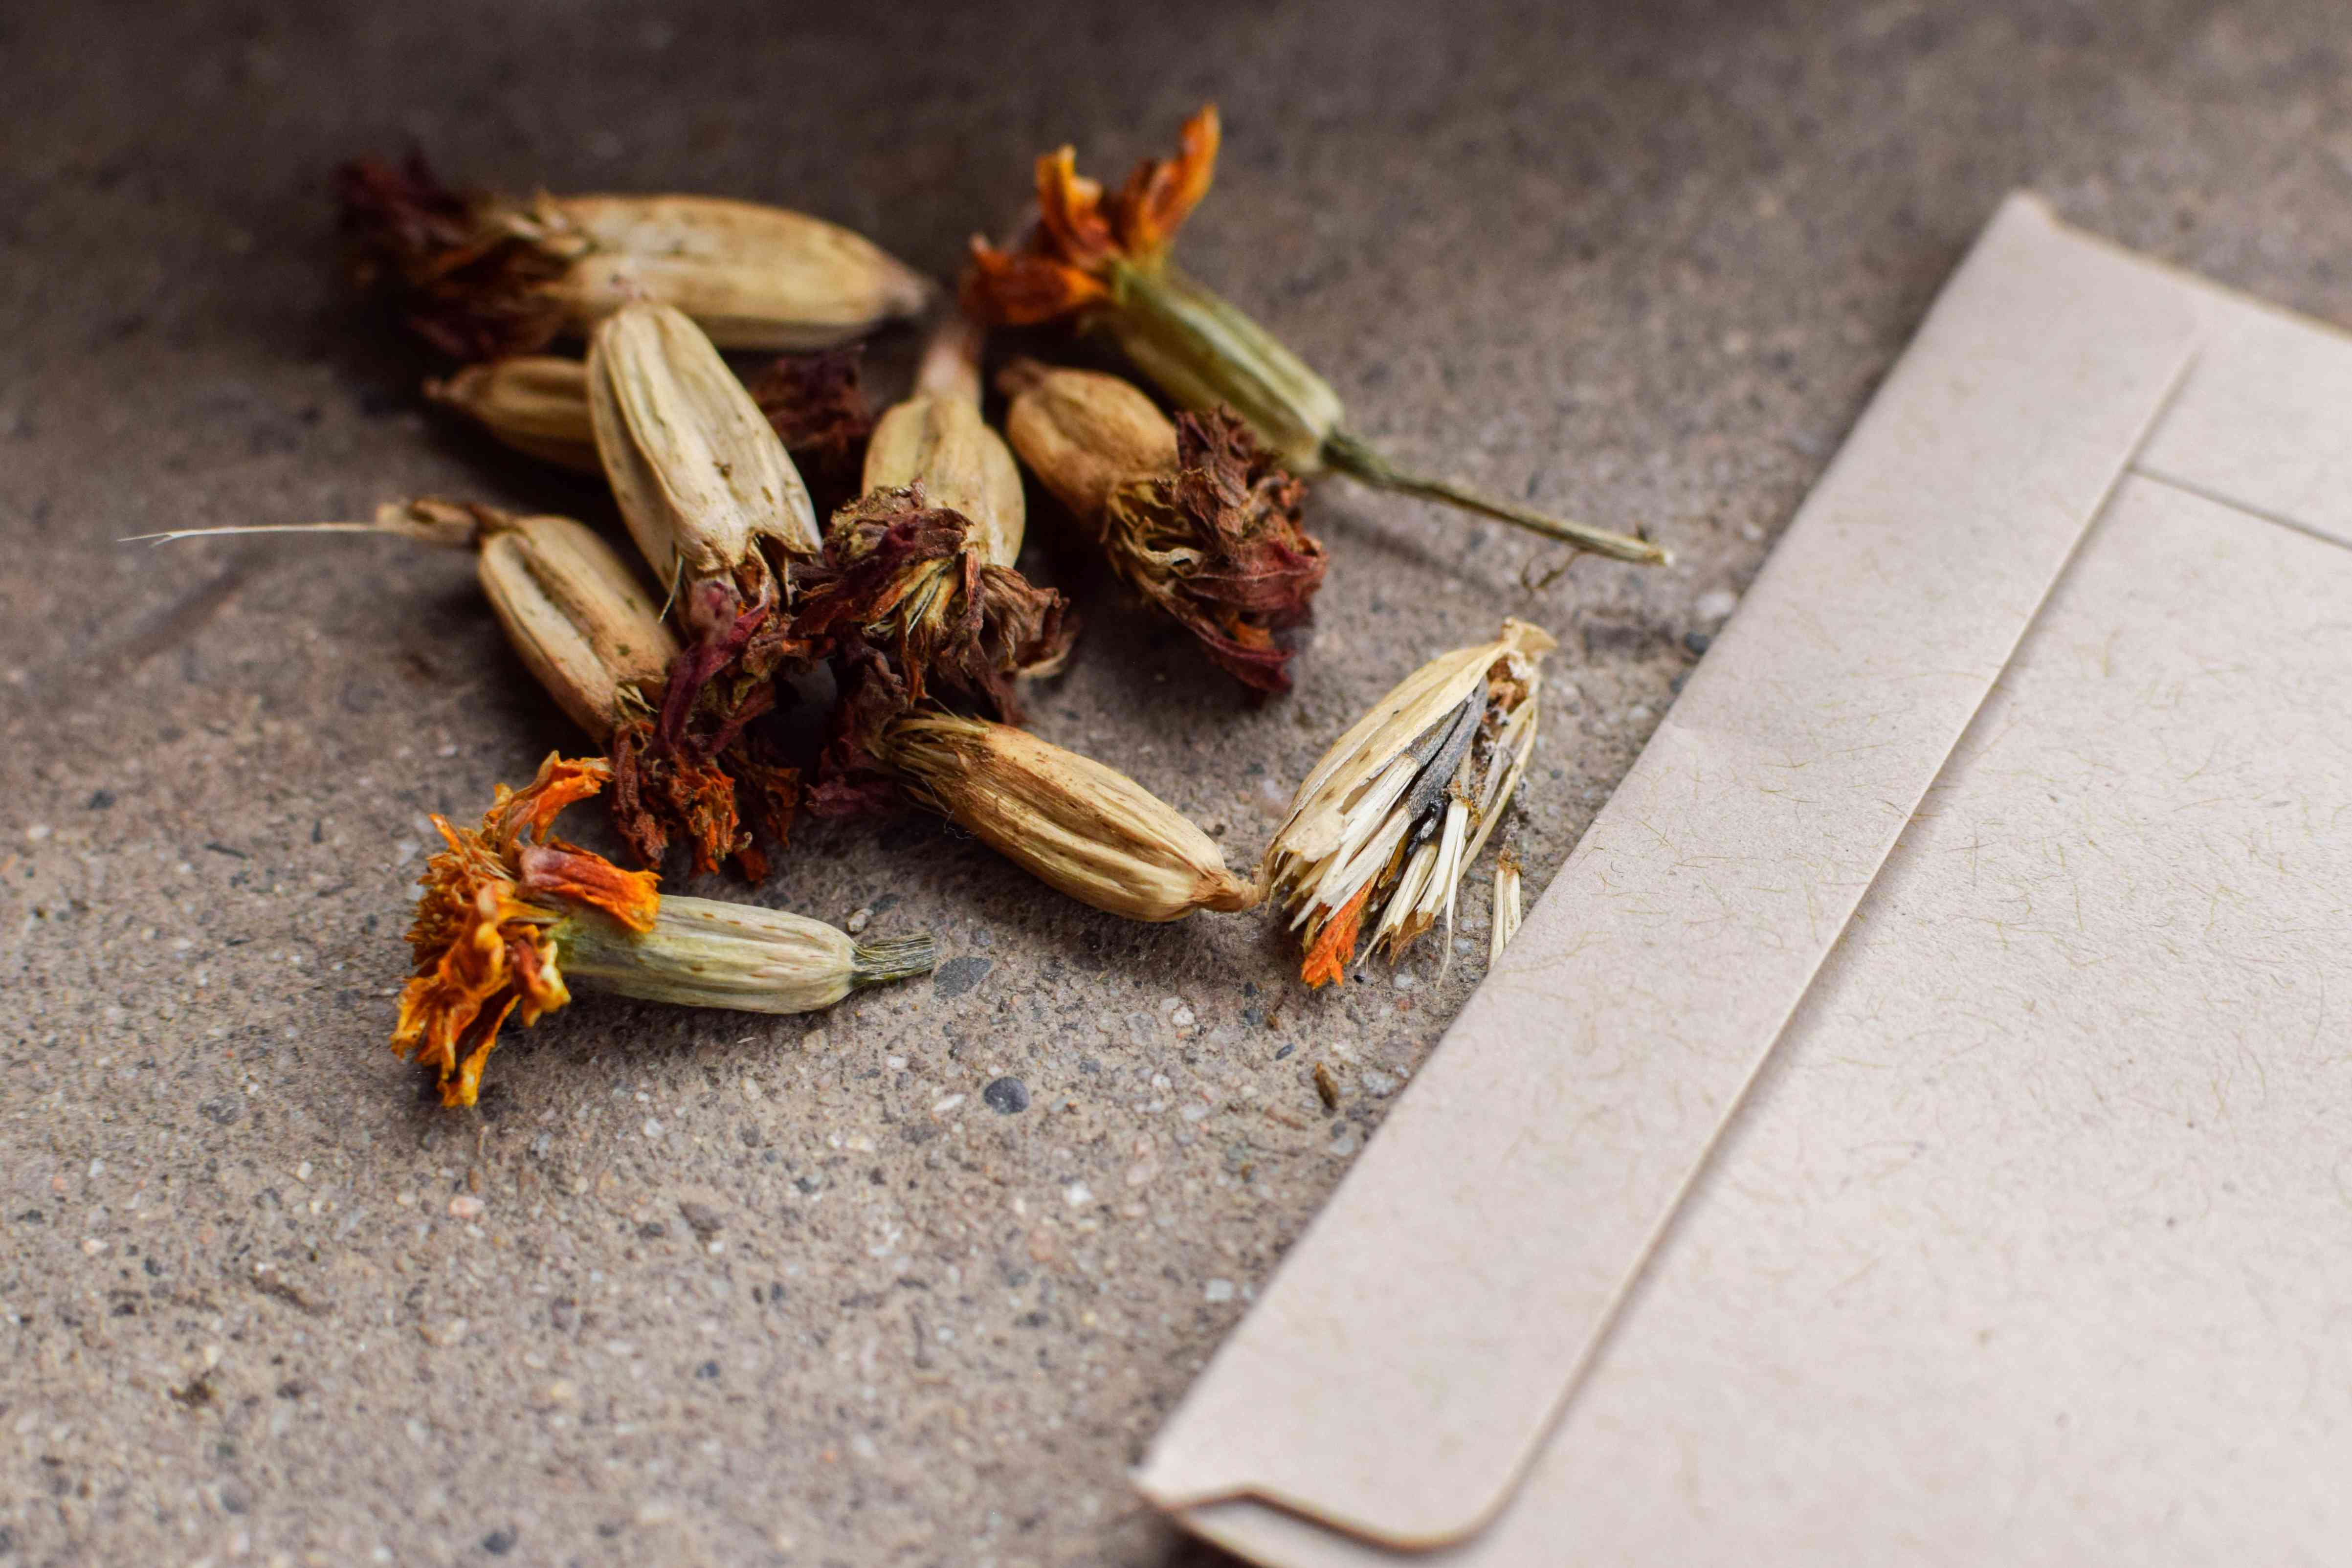
For this article, “marigold seeds” refers mainly to common garden marigolds in the Tagetes group. Their seeds are long, narrow, and two-toned: dark at one end and pale or straw-like at the other. They often look like tiny paintbrushes, which is adorable until you accidentally spill hundreds of them on the porch and spend ten minutes negotiating with the wind.
Open-Pollinated vs. Hybrid Marigolds
Before saving seeds, it helps to understand one important point: not all saved seeds grow exactly like the parent plant.
Open-Pollinated and Heirloom Marigolds
Open-pollinated marigolds are more likely to produce plants similar to the parent, especially if they were not cross-pollinated with nearby varieties. Heirloom varieties are open-pollinated plants passed down over time because gardeners valued their traits. If your goal is to save marigold seeds that come back looking much like this year’s flowers, open-pollinated varieties are your best choice.
Hybrid Marigolds
Hybrid marigolds are bred by crossing specific parent lines. They may offer excellent color, uniform growth, disease resistance, or extra-large blooms. However, seeds saved from hybrids may not grow true to type. Next year’s plants might be taller, shorter, less uniform, or a different shade than expected. That does not mean the seeds are useless. It means you should expect a little garden improv.
If you do not know whether your marigolds are hybrid or open-pollinated, check the original seed packet or plant tag. Look for terms like “F1 hybrid,” “hybrid,” “heirloom,” or “open-pollinated.” No packet? No problem. Save the seeds anyway, plant them next season, and treat the results as an experiment. Gardening is basically patience wearing gloves.
When to Harvest Marigold Seeds
The best time to harvest marigold seeds is after the flower head has dried completely on the plant. Do not rush this stage. A faded bloom is not automatically ready. The petals may look tired, but the seeds inside still need time to mature.
Signs Marigold Seeds Are Ready
Look for flower heads that are brown, dry, and papery. The base of the bloom, called the calyx, should feel firm and dry rather than green and soft. The petals will usually be shriveled or gone. When you gently pull apart the dried head, the seeds inside should be dark at one end and firm, not pale, soft, or bendy.
A good harvest-ready marigold head looks like it has finished its performance and is now backstage changing into seed form. It will not be glamorous, but it will be useful.
Choose a Dry Day
Harvest on a dry, sunny day if possible. Avoid collecting seed heads after rain, heavy dew, or overhead watering. Moisture is the enemy of stored seeds because it encourages mold and rot. If your weather has been damp, wait for a stretch of dry conditions or bring the flower heads indoors to finish drying before removing the seeds.
Tools You Need to Save Marigold Seeds
You do not need fancy equipment. In fact, marigold seed saving is refreshingly low-tech. Gather these basic supplies:
- Clean scissors or garden snips
- A paper bag, envelope, basket, or bowl
- A tray, paper towel, screen, or plate for drying
- Small paper envelopes or glass jars for storage
- A pen or marker for labeling
- Optional: silica gel packet for extra moisture control
Paper bags and envelopes are especially helpful during drying because they allow moisture to escape. Plastic bags can trap humidity, so avoid them unless the seeds are already completely dry and you are storing them with proper moisture control.
How to Harvest and Save Marigold Seeds Step by Step
Step 1: Select the Best Plants
Start with healthy marigold plants. Choose flowers from plants that had strong growth, good color, plenty of blooms, and no major disease problems. Avoid saving seeds from weak, diseased, or heavily pest-damaged plants. Seed saving is like choosing next year’s team. Do not recruit the player who spent all season looking suspiciously wilted.
Step 2: Stop Deadheading Some Blooms
Deadheading, or removing spent flowers, encourages marigolds to keep blooming. However, if you remove every faded bloom, the plant never gets a chance to form mature seeds. Toward late summer or early fall, leave several healthy flowers on the plant so they can dry naturally.
You can still deadhead other blooms to keep the plant tidy. Just mark or remember which flowers you are leaving for seed. A small ribbon, plant tag, or very confident memory may help. If your memory is anything like a garden hose after winter storagetwisted and unreliableuse the tag.
Step 3: Let Flower Heads Dry on the Plant
Allow the selected blooms to fade, shrink, and dry while attached to the plant. This gives the seeds time to mature fully. The flower head should turn brown and feel dry before you harvest it.
If frost, heavy rain, or plant cleanup forces you to harvest early, clip the mature-looking heads and let them finish drying indoors. Place them in a single layer on a tray in a warm, dry, well-ventilated area. Do not pile them up, or trapped moisture may cause problems.
Step 4: Clip the Dried Flower Heads
Use clean scissors or snips to cut the dried marigold heads from the plant. Leave a short stem if that makes handling easier. Drop the heads into a paper bag, bowl, or basket. If you are saving seeds from different colors or varieties, keep them separate and label them immediately.
This is important because all dried marigold heads start looking suspiciously alike after a while. Today you may think, “Of course I’ll remember which one was the dwarf orange variety.” In three weeks, you will be holding an envelope labeled only “flowers???” and questioning your life choices.
Step 5: Dry the Heads a Little Longer Indoors
Even if the flower heads feel dry outside, give them extra drying time indoors. Spread them on a paper towel, tray, screen, or plate for about one week. Choose a location away from direct moisture and strong drafts. Good air circulation helps prevent mold.
The goal is to make sure the seeds are completely dry before storage. Proper drying is one of the most important steps in saving marigold seeds successfully.
Step 6: Open the Seed Heads
Once the heads are dry, hold one over a bowl or paper towel and gently pull it apart. You will see long, slender seeds attached inside the base. Pull them free with your fingers. Each seed usually has a dark, pointed end and a lighter, bristle-like end.
Do not worry about removing every bit of chaff. A little dried plant material is harmless if everything is completely dry. However, cleaner seeds are easier to store, label, share, and sow later.
Step 7: Separate Good Seeds from Debris
Pick out petals, dried husks, and broken pieces. Keep seeds that are firm, dark at one end, and mature-looking. Discard seeds that are pale, soft, moldy, or shriveled. If you saved many flower heads, you can be picky. Marigolds are generous. One plant can produce more seed than most gardeners need unless you are planning to landscape a small kingdom.
Step 8: Final-Dry the Seeds
After removing the seeds, spread them in a thin layer on a paper towel or plate for several more days. This final drying period helps remove hidden moisture. Stir or gently move them once a day so all sides dry evenly.
Do not dry seeds in a hot oven or microwave. Too much heat can damage the embryo inside the seed. Room temperature, airflow, and patience are enough.
Step 9: Store Seeds Properly
Place fully dry marigold seeds in labeled paper envelopes, coin envelopes, or small glass jars. Label each container with the plant name, flower color, variety if known, and harvest year. Store the seeds in a cool, dark, dry place. A closet, drawer, pantry shelf, or sealed container in a stable indoor location can work well.
If your home is humid, place the envelopes inside an airtight jar with a silica gel packet. Make sure the seeds are dry first. Airtight storage is excellent for dry seeds but risky for damp ones. Moisture sealed in a jar is basically a mold spa, and nobody invited that.
How Long Do Marigold Seeds Last?
Marigold seeds are usually best planted within one to three years. Like many annual flower seeds, they lose viability over time. Older seeds may still sprout, but germination rates often decline. For the strongest results, use fresh seed the following spring.
If you are unsure whether older marigold seeds are still good, run a simple germination test. Place ten seeds on a damp paper towel, fold it, put it inside a loosely closed plastic bag, and keep it warm. Check after several days. If most seeds sprout, your batch is still useful. If only one or two wake up, sow heavily or start with fresher seed.
How to Plant Saved Marigold Seeds Next Season
Saved marigold seeds can be started indoors or sown directly outdoors after the danger of frost has passed. Marigolds like warmth, sunlight, and well-drained soil. They are not fussy, but they do not appreciate cold, soggy conditions.
Starting Indoors
Start seeds indoors about four to eight weeks before your last expected spring frost, depending on your growing region and transplant goals. Sow seeds about one-quarter inch deep in seed-starting mix. Keep the soil lightly moist and warm. Once seedlings appear, give them bright light to prevent legginess.
Direct Sowing Outdoors
For direct sowing, wait until the soil has warmed and frost danger has passed. Plant seeds shallowly, water gently, and keep the soil evenly moist until germination. Thin seedlings so they have enough room to grow. Crowded marigolds can still bloom, but airflow helps reduce disease issues.
Common Mistakes When Saving Marigold Seeds
Harvesting Too Early
Green or partly dry flower heads may contain immature seeds. Let the heads become brown, papery, and dry before collecting. Mature seeds are much more likely to germinate well.
Storing Seeds Before They Are Dry
This is the biggest mistake. Seeds may feel dry on the surface but still hold moisture. Always allow extra drying time indoors before sealing them in containers.
Forgetting to Label
Label your seeds right away. Include the year, color, and variety if known. Future you will be grateful, and future you deserves nice things.
Expecting Hybrids to Grow True
Seeds saved from hybrid marigolds may produce different plants. That is normal. If consistent results matter, save from open-pollinated varieties or buy fresh seed of the exact hybrid you want.
Saving from Weak Plants
Choose seeds from the healthiest and most vigorous marigolds. Avoid plants with disease or poor growth. Seed saving is a form of selection, so select the traits you actually want to see again.
Can Marigolds Self-Seed?
Yes, marigolds can self-seed in some gardens, especially where winters are mild or dropped seeds survive until spring. If you leave dried flower heads on the plants, seeds may fall naturally and sprout when conditions are right.
However, self-seeding is not always predictable. Mulch, birds, cleanup, winter moisture, and soil disturbance can all affect whether seeds survive. If you want reliable marigolds next year, collect and store seeds yourself. Think of self-seeding as a bonus, not a retirement plan.
Best Storage Containers for Marigold Seeds
The best container depends on your climate and how dry the seeds are. Paper envelopes are ideal for short-term storage because they breathe. Small glass jars work well for fully dried seeds, especially when stored in a cool, dark place. Plastic containers can be used, but only if seeds are completely dry.
For extra organization, place labeled paper envelopes inside a larger airtight jar. Add a silica gel packet if humidity is a concern. Keep the jar away from sunlight, heat, and temperature swings. A seed collection stored above a stove, near a sunny window, or in a damp garage may lose viability faster.
Creative Ways to Use Saved Marigold Seeds
Once you save marigold seeds, you may end up with more than you need. That is a happy problem. Use extras to fill bare spots, plant along vegetable beds, start containers, or share with neighbors. Marigold seeds also make sweet additions to homemade garden gifts.
Try placing seeds in small envelopes labeled with planting instructions. Add them to a spring gardening basket, tuck them into greeting cards, or share them at a local seed swap. A packet of homegrown marigold seeds says, “I thought of you,” but with more chlorophyll.
My Practical Experience Saving Marigold Seeds
The first time I saved marigold seeds, I made the classic beginner mistake: I harvested too early because I was excited. The flower heads looked faded, so I assumed the seeds were ready. They were not. Many were pale, soft, and about as promising as a soggy cracker. The next spring, only a few sprouted. Lesson learned: faded is not the same as fully dry.
After that, I started waiting until the flower heads were brown, crisp, and almost ugly. That is when the magic happens. Beautiful blooms are for admiring; ugly dried heads are for seed saving. Once I accepted that, my success rate improved dramatically.
One helpful habit is choosing seed flowers before the whole plant becomes a late-season jungle. In mid to late summer, I look for the strongest marigold plants and mentally mark the blooms I want to leave alone. Sometimes I use a twist tie or small string on the stem. This keeps me from accidentally deadheading the very flowers I meant to save. It also makes me look like I have a system, which is always nice, even when the garden knows the truth.
I have also learned to separate seeds by color and plant size. One year, I tossed every saved marigold seed into the same jar. The following spring, I planted them along a neat border and got a surprise parade: tall orange marigolds, short yellow marigolds, mixed rusty-red blooms, and one plant that seemed determined to become a shrub. It was cheerful, but not exactly the tidy edging I had imagined. Now I label envelopes as “short orange,” “large yellow,” or “mixed mystery marigolds.” The mystery envelope is still fun, but at least it is honest.
Drying time matters more than many gardeners think. I prefer to dry whole flower heads for about a week, remove the seeds, then dry the cleaned seeds for several more days. This two-stage drying method has prevented mold and kept the seeds easy to store. I spread them on a paper towel in a shallow tray and keep them away from the kitchen sink, because steam and seeds are not best friends.
Another useful experience: save more seeds than you think you need, but not every seed the plant produces. Marigolds can be wildly generous. If you save every dried head from several plants, you may end up with enough seeds to supply your block, your cousin, and possibly a small public park. I usually save the best heads from the best plants, then compost the rest or let some drop naturally in the garden.
When planting saved seeds, I sow a little more thickly than I would with fresh commercial seed. Home-saved seeds can have variable germination, especially if storage conditions were not perfect. Once seedlings come up, thinning is easy. It may feel harsh to remove extras, but crowded seedlings compete for light and airflow. A little space early on creates stronger plants later.
The biggest reward is emotional, not financial. There is something deeply satisfying about seeing new marigold seedlings from flowers you grew the year before. It makes the garden feel continuous. Last year’s blooms become this year’s seedlings, and suddenly you are not just buying plantsyou are participating in the whole cycle. Also, you get to say things like “these are from my own saved seed,” which sounds impressively homestead-adjacent even if you are standing beside a plastic watering can in flip-flops.
Conclusion
Harvesting and saving marigold seeds is simple, rewarding, and wonderfully beginner-friendly. Let the flower heads dry fully on healthy plants, collect them on a dry day, remove the slender seeds, dry them thoroughly, and store them in labeled containers away from heat and moisture. For the most predictable results, save seeds from open-pollinated marigolds. For a little adventure, try seeds from hybrids and enjoy whatever sunny surprises appear.
Marigolds are already one of the easiest annual flowers to grow, and saving their seeds makes them even more valuable. With a few dry flower heads and a little patience, you can fill next season’s garden with color, charm, and the quiet satisfaction of growing something from your own harvest. Not bad for a flower that asks for sunshine and gives back confetti with roots.