There are few craft problems more dramatic than needing a square sheet of paper and having only a regular rectangle staring back at you from the desk. Origami instructions demand a square. Paper snowflakes behave better with a square. Handmade envelopes look neater with a square. Meanwhile, your printer paper sits there smugly in its 8.5-by-11-inch glory, acting like it has never heard of geometry.
The good news is that learning how to make a square sheet of paper is wonderfully simple. You do not need a fancy paper cutter, a math degree, or a ceremonial craft apron. With one clean fold and one careful cut, a rectangular sheet can become a neat square ready for origami, kirigami, cards, kids’ crafts, gift tags, paper boxes, and more. Once you understand the method, you can make square paper from copy paper, construction paper, scrapbook paper, magazine pages, wrapping paper, or even that one worksheet your printer spit out sideways for reasons known only to the printer gods.
This guide explains several reliable ways to make square paper, from the classic fold-and-cut method to a ruler-based method for projects that need extra precision. You will also learn common mistakes, troubleshooting tips, safety advice, and practical examples for choosing the right square size.
Why So Many Paper Crafts Start With a Square
A square sheet of paper has four equal sides and four right angles. That simple shape is the foundation for many folding projects because it gives the paper balanced proportions. When you fold a square corner to corner, the diagonal divides it into two matching triangles. Fold it in half vertically or horizontally, and both halves match perfectly. This symmetry is why square paper is so popular in origami and many classroom crafts.
Origami, in particular, often begins with a square because the folds depend on matching edges, corners, and center points. If the sheet is even slightly crooked, the final model may still work, but it can come out lopsided. A crane may lean like it has had a long day. A paper box may refuse to close. A paper star may look more like a confused sea creature. Precision at the beginning saves frustration later.
In the United States, the most common everyday paper is Letter size, which measures 8.5 by 11 inches. If you turn that sheet into the largest possible square, the square will be 8.5 by 8.5 inches, and the leftover strip will measure about 2.5 by 8.5 inches. Do not throw that strip away too quickly. It can become a bookmark, a label, a practice strip for cutting, or a tiny paper chain if you are feeling festive.
What You Need to Make a Square Sheet of Paper
The basic supplies are beautifully ordinary. You need a rectangular sheet of paper and a pair of scissors. That is enough for the classic method. For cleaner results, especially with thicker paper, add a pencil, ruler, bone folder, craft knife, and cutting mat. If children are making the square, use child-safe scissors and adult supervision.
Best Paper Types to Try
Copy paper is the easiest paper for beginners because it folds crisply and cuts without much resistance. Construction paper works well for kids’ crafts, although it may create softer, bulkier folds. Scrapbook paper is excellent for decorative projects such as envelopes, boxes, bookmarks, and cards. Wrapping paper can make large squares, but because it is thin and slippery, it needs a steady hand. Cardstock can also be squared, but it is better to score the fold lightly before cutting so the edge stays clean.
The Easiest Method: Fold and Cut a Rectangle Into a Square
This is the fastest and most popular way to make a square sheet of paper. It uses the paper’s own edge as your guide, so you do not need to measure anything. The method works because folding one short edge to meet the long edge creates a diagonal across what will become the square.
Step 1: Place the Paper in Portrait Position
Lay the rectangular paper on a flat surface with the short edge at the top and the long edges running vertically. This is called portrait orientation. Smooth the paper with your hand so it lies flat. If the paper already has a curl, place the curled side down so it does not keep popping up like it has a personal objection to your craft plans.
Step 2: Fold One Top Corner Across
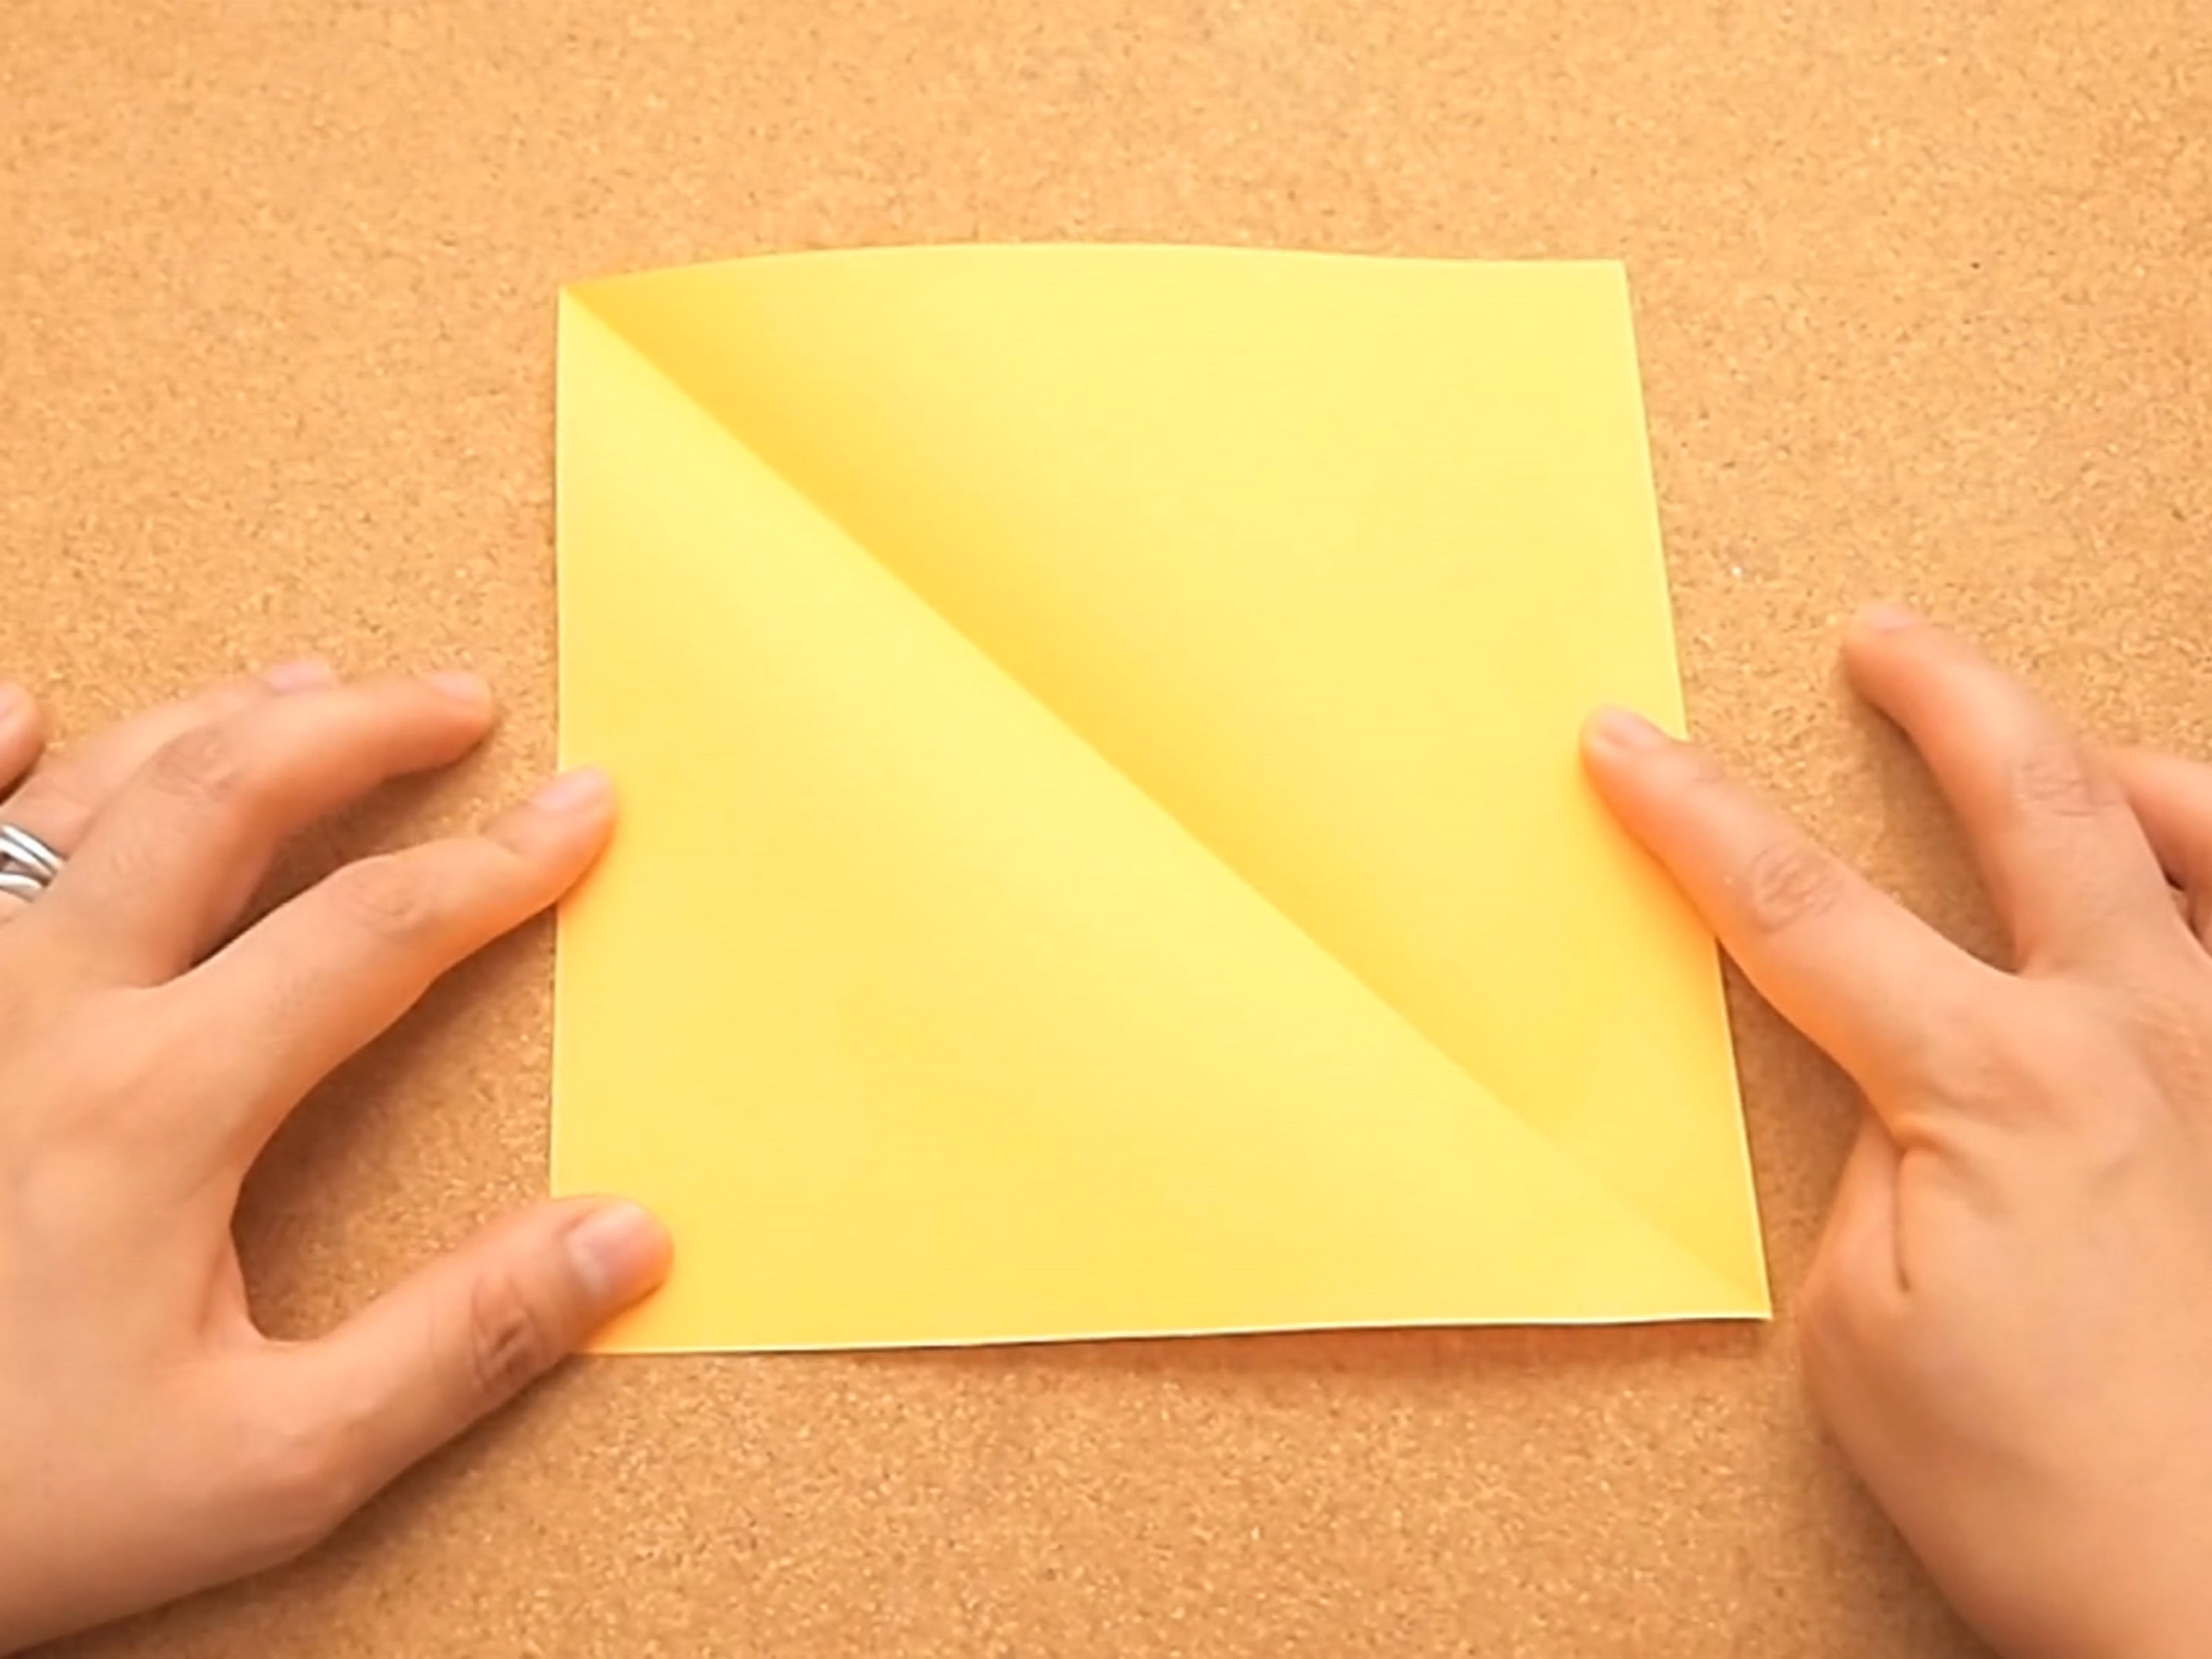
Take the top right corner and fold it down toward the left edge of the paper. Line up the top edge with the opposite side edge as neatly as possible. You are trying to create a triangle at the top with a rectangular strip left at the bottom. Before pressing the crease, check that the two edges match from corner to corner. This tiny pause is the difference between “perfect square” and “close enough rectangle wearing a disguise.”
You can also fold the top left corner toward the right edge. Either direction works. The important part is that one top edge aligns perfectly with the opposite side edge.
Step 3: Crease the Diagonal Firmly
Once the edges are aligned, press down along the diagonal fold. Use your fingers, the side of a ruler, or a bone folder. A sharp crease gives you a clearer cutting guide. If you are using delicate paper, press gently so you do not tear the fibers.
Step 4: Cut Off the Extra Strip
You will see a rectangular strip sticking out below the triangle. Cut along the straight edge of the folded triangle. If you prefer extra accuracy, draw a light pencil line along the edge first, unfold slightly, and cut on the line. For young crafters, it may help to have an adult steady the paper while the child cuts slowly.
Step 5: Unfold the Triangle
Open the folded triangle, and there it is: a square sheet of paper. It will have one diagonal crease, which is usually not a problem for origami because many beginner folds start with a diagonal anyway. For projects where the crease would show, use the no-crease method below.
How to Make a Square Sheet Without a Diagonal Crease
Sometimes you need a square that looks clean and untouched, especially for a card front, calligraphy piece, scrapbook layout, paper flower, or decorative invitation. The classic fold-and-cut method leaves a diagonal crease, so here is a cleaner alternative.
The Two-Sheet Template Method
Take two rectangular sheets of the same size. Place one sheet on the table in portrait orientation. Rotate the second sheet 90 degrees and lay it across the first sheet so the edges form a square overlap. The exposed extra rectangle on the bottom sheet can be trimmed away using the top sheet as a guide. When you remove the top sheet, the bottom sheet is now a square without a diagonal crease.
This method is great when you need several matching squares. Once you have one square, use it as a template. Place it on another sheet, trace around it, and cut. This is faster than folding every sheet, and it keeps your finished paper flatter.
How to Make a Square Sheet With a Ruler
The ruler method is best when you need a specific size, such as a 6-inch square, 7-inch square, or 5-by-5-inch square for greeting cards. It is also helpful when you are working with thicker paper that does not fold cleanly.
Step-by-Step Ruler Method
First, decide the side length of your square. If your paper is 8.5 by 11 inches, the largest square you can cut is 8.5 by 8.5 inches. For smaller squares, choose any measurement that fits inside the sheet.
Use a ruler to measure the chosen length along the top edge. Mark it lightly with a pencil. Then measure the same distance down the side edge and mark again. Use the ruler to draw a straight line connecting your marks, making sure the corners are square. A right-angle ruler or quilting square can help if you have one. Cut along the pencil lines slowly and steadily.
If your square needs to be very accurate, measure all four sides after cutting. They should match. If one side is a little long, trim it carefully. Remember: paper is forgiving, but only up to a point. After the fifth correction, you may accidentally invent a new shape.
How to Make Multiple Square Sheets Quickly
If you are preparing for a classroom activity, party craft, origami lesson, or family snowflake session, cutting one square at a time can become boring fast. The solution is to make a template.
Create one accurate square first. Then stack several sheets of paper underneath it. Trace the square onto the top sheet or use the template as a cutting guide. If using scissors, cut only a few sheets at once so the stack does not slide. If using a craft knife, place the stack on a cutting mat, hold a metal ruler firmly along the edge, and cut in light passes rather than trying to slice everything in one dramatic move.
For kids, pre-cutting squares before the activity can make the craft more enjoyable. Children can start folding, drawing, or gluing right away instead of spending half the session negotiating with scissors.
Common Mistakes When Making Square Paper
Not Aligning the Edges Before Creasing
The most common mistake is rushing the fold. If the top edge does not line up perfectly with the side edge, the square will be slightly off. Before creasing, adjust the corner until the edges are flush. Think of it as tucking the paper into bed: corners first, then the blanket.
Cutting Too Far From the Guide Edge
If you cut below or above the guide edge, your square may have one uneven side. To avoid this, cut directly along the edge of the folded triangle or draw a pencil line first. Slow cutting is better than fast cutting, especially if you want the finished square to behave during origami.
Using Dull Scissors
Dull scissors can chew the paper instead of cutting it. This leaves fuzzy edges and tiny tears. Use sharp scissors for adult projects and child-safe scissors for young crafters. For thick cardstock, a craft knife and ruler usually create a cleaner edge.
Forgetting About Paper Grain
Paper grain refers to the direction in which fibers tend to run. With regular copy paper, this usually is not a big concern. With thicker paper, watercolor paper, or specialty craft paper, grain can affect how smoothly the paper folds. Folding parallel to the grain often feels easier and produces a cleaner crease. If the paper resists or cracks, try rotating the sheet before folding or score the line gently.
What Can You Make With a Square Sheet of Paper?
Once you have a square, you have a ticket to a surprisingly large craft universe. You can fold origami cranes, boats, flowers, frogs, hearts, stars, envelopes, boxes, and bookmarks. You can cut paper snowflakes, make garlands, design mosaics, create greeting-card windows, or fold party decorations. A stack of square paper is also useful for classroom math lessons because students can explore symmetry, fractions, diagonals, angles, and area with their hands instead of only staring at diagrams.
For gift wrapping, square paper can become a small envelope for jewelry, stickers, gift cards, or notes. For journaling, mini squares can become tabs, labels, and decorative inserts. For home organization, leftover paper strips from the square-making process can become labels for jars, folders, drawers, and cables. Never underestimate a scrap of paper. It has ambitions.
How to Choose the Right Square Size
The right size depends on the project. For beginner origami, 6-by-6-inch paper is comfortable because it is large enough to fold easily but not so large that it flops around. For paper cranes, 6-inch or 8-inch squares work well. For small envelopes, try 7-inch or 8-inch squares. For paper boxes, start with larger squares because the finished box will be much smaller than the starting sheet.
If you are using U.S. Letter paper, the biggest square you can make is 8.5 inches. If you are using A4 paper, the largest square will be as wide as the shorter side of the sheet. For wrapping paper or poster paper, you can make much larger squares, but use a ruler or template so the sides stay even.
Safety Tips for Kids and Classrooms
When children make square paper, keep the setup simple. Use blunt-tip scissors, a stable table, and paper that is easy to fold. Show the fold first, then let the child try. Encourage them to cut slowly and keep fingers away from the blades. For preschoolers, adults can make the fold and draw the cutting line while the child practices cutting along it.
For group activities, prepare a few extra squares. Someone will cut the wrong side. Someone will make a triangle and proudly declare the project complete. Someone will turn the scrap strip into a mustache. This is normal. Crafts are part instruction, part comedy show.
Troubleshooting: How to Fix an Imperfect Square
If your square looks uneven, fold it in half edge to edge. If the corners do not match, trim the longer side slightly. You can also fold it diagonally both ways to see whether the corners meet neatly. For origami, a small error may still be usable for simple models. For boxes, envelopes, and modular projects, accuracy matters more because small mistakes multiply as the folds build up.
If the paper curls after cutting, place it under a heavy book for a few minutes. If the crease is too strong for your project, turn the paper over and gently bend it the opposite way. If the cut edge is rough, trim it with sharper scissors or use a craft knife and ruler.
Personal Experience: What Making Square Paper Teaches You
The first time many people learn how to make a square sheet of paper, they treat it like a tiny magic trick. You begin with an ordinary rectangle, fold one corner across, cut away the extra strip, unfold the triangle, and suddenly the paper has transformed. It feels almost too easy, which is exactly why the skill sticks. After you do it once, you can do it forever.
In real craft situations, though, the little details matter. I have seen a roomful of students make paper squares from copy paper, and the difference between the neat results and the wobbly ones usually came down to patience. The students who paused before creasing, checked the edge alignment, and cut slowly ended up with squares that folded beautifully. The students who attacked the paper like they were racing a kitchen timer ended up with creative quadrilaterals. They still had fun, but their origami frogs looked emotionally complicated.
One useful habit is to run a finger along the aligned edges before making the crease. If you feel one edge sticking out, adjust it. Another helpful trick is to cut with the longer part of the scissors rather than making tiny snips with the tips. Long, steady cuts usually create cleaner edges. If you are cutting several squares for a project, make one perfect square first and treat it like royalty. Use it as your master template instead of trusting every new fold to be identical.
Making square paper is also a great reminder that simple skills can unlock bigger projects. A square sheet can become an origami crane, a paper box, a bookmark, a card decoration, a math manipulative, or a snowflake. The leftover strip can become a label, a mini bookmark, or a practice piece for testing markers and glue. Nothing has to go to waste.
For adults, the process can be oddly relaxing. There is something satisfying about lining up the edges, pressing a clean crease, and cutting away the excess. It is a tiny moment of order in a world full of crooked tabs, jammed printers, and mystery cords. For kids, it builds hand-eye coordination, measurement awareness, and confidence. They learn that accuracy is not about being perfect; it is about slowing down enough to notice what the paper is doing.
The best advice is simple: do not rush the first fold. That fold decides everything. A clean fold creates a clean square, and a clean square makes every craft after it easier. Once you can make a square sheet of paper from any rectangle, you will never look at printer paper the same way again. You will see cranes, boxes, stars, envelopes, flowers, and possibly a few emergency paper mustaches waiting to happen.
Conclusion
Making a square sheet of paper is one of the easiest and most useful paper-craft skills you can learn. The classic fold-and-cut method takes less than a minute, needs only paper and scissors, and works with common rectangular sheets such as U.S. Letter paper. For projects that need a crease-free surface, use a second sheet as a template. For exact sizes, use a ruler, pencil, and straight edge. The secret is not complicated: align carefully, crease firmly, cut slowly, and check your sides before starting the final craft.
Whether you are folding origami, preparing a classroom activity, making decorations, or just trying to turn a boring rectangle into something more useful, a square sheet is the perfect starting point. It is simple geometry with surprisingly big creative energy.