There is a special kind of heartbreak that happens when you paint a beautiful piece of wood and realize, three brushstrokes too late, that you have completely buried the grain. That oak, pine, maple, or reclaimed board once had personality. Now it looks like a very enthusiastic piece of plastic.
Fortunately, the color washing paint technique offers a much better compromise. You can introduce blue, white, gray, green, beige, charcoal, or almost any other color while still allowing knots, grain lines, saw marks, and natural variations to remain visible.
Think of color washing as giving wood a pair of lightly tinted sunglasses rather than putting a ski mask over its face.
The technique relies on a thin, translucent layer of color rather than an opaque coat of paint. Depending on the product and surface, that may mean diluted water-based paint, a dedicated color-wash product, transparent stain, glaze, or another compatible translucent wood finish. The result can range from subtle Scandinavian simplicity to weathered farmhouse charm.
Research synthesized from U.S. sources including This Old House, Sherwin-Williams, Minwax, Home Depot, Family Handyman, Bob Vila, Rust-Oleum, General Finishes, WOOD Magazine, Popular Woodworking, Rockler, Woodcraft, Lowe’s and Behr. Technique fundamentals:
What Is Color Washing Wood?
Color washing is a decorative finishing technique in which a relatively transparent layer of color is applied over wood and manipulated before it fully sets. Instead of completely covering the surface, the wash changes the overall tone while allowing the underlying grain to remain part of the design.
This is similar to whitewashing, except you are not limited to white. A wash can be smoky gray, faded denim blue, muted sage, terracotta, dusty black, warm cream, or practically any color that works with your room.
The amount of grain that remains visible depends on three big factors: how opaque the coloring product is, how much it is reduced or wiped back, and how absorbent the wood is.
Traditional paint contains enough pigment to hide a surface when applied at normal thickness. Stains, dyes, washes, and toners generally contain or leave less obscuring pigment, making them better suited to projects where you want to see the wood underneath.
Why Color Washing Works So Well on Wood
Wood grain is not merely a printed pattern sitting on top of a board. Different areas absorb liquids differently, and open pores, knots, growth rings, and surface texture influence how color settles.
A thin wash takes advantage of those differences. Pigment may collect slightly more in pores and recessed areas while remaining lighter across flatter areas. After the excess is wiped away, those variations can make the grain look more dramatic instead of less visible.
That makes color washing particularly useful for:
- Furniture makeovers
- Farmhouse tables
- Wood accent walls
- Cabinet doors
- Floating shelves
- Picture frames
- Wooden crates
- Headboards
- Interior doors
- Reclaimed lumber projects
Open-grained woods such as oak and ash can produce especially dramatic effects because pigment can emphasize their pores. Pine also looks beautiful under a wash, although its uneven density means blotching deserves extra attention.
Color Wash vs. Whitewash vs. Stain
Color Wash
A color wash usually describes a thin decorative layer of paint or glaze. The goal is partial transparency rather than solid coverage.
Whitewash
Whitewashing follows essentially the same visual concept but uses white or off-white coloring. Modern DIY versions often involve water-based white paint diluted with water or a purpose-made whitewash product. This Old House, for example, describes a 1:1 paint-and-water mixture as a useful starting point for a DIY whitewash, with more water producing greater transparency.
Wood Stain
Stain is formulated specifically to color wood without behaving like ordinary opaque paint. Transparent and semi-transparent stains are often the better choice when durability, predictable absorption, or manufacturer-tested performance matters.
In other words, color washing and staining are cousins. They attend the same family reunion, but they are not wearing identical name tags.
What You Need for a DIY Color Wash
For a simple interior project using a compatible water-based paint wash, gather:
- Clean wood or furniture
- Water-based acrylic or latex paint suitable for the project
- Clean water
- A mixing container
- Paint stirrer
- Quality paintbrush or foam brush
- Lint-free cotton rags
- Sandpaper or sanding sponge
- Vacuum or tack cloth
- Gloves
- Scrap wood for testing
- Optional clear protective topcoat
One caution matters here: do not assume every commercial furniture or cabinet paint should be heavily diluted. Some manufacturers specifically discourage thinning particular coatings because it can affect performance. When in doubt, follow the product label or choose a purpose-made transparent stain, glaze, or color-wash finish instead.
How to Prepare Wood for Color Washing
1. Clean the Surface
Color washing is forgiving about artistic imperfections. It is considerably less forgiving about furniture polish, kitchen grease, dirt, and mystery substances left behind by previous owners.
Wash the surface thoroughly with an appropriate cleaner and allow it to dry completely.
2. Remove Incompatible Existing Finishes
Bare wood readily absorbs a wash, while a heavily sealed or glossy surface may cause it to sit on top instead. Previously finished pieces therefore may require cleaning, deglossing, sanding, stripping, or a compatible glaze system depending on the finish you are trying to create.
For a strong raw-wood effect, stripping an old opaque finish back to wood generally produces the most natural results.
3. Sand With the Grain
Sand enough to smooth damage and create an even surface without polishing the wood excessively. For many projects, sanding somewhere around 120 to 180 grit before coloring is a practical range, although the best grit depends on the wood and finishing system.
Remove the dust carefully. Tiny piles of sanding dust have an impressive ability to become enormous visual defects once finish hits them.
Surface preparation principles are consistent across refinishing guidance from Home Depot, Behr, This Old House and woodworking publications.
How to Mix Color Wash Paint
There is no universal magic ratio because paints have different pigment loads, viscosities, and binders. Wood species also absorb liquids differently.
For a basic decorative wash made from a suitable water-based paint, however, you can test three starting points:
- Subtle wash: 1 part paint to 3 or 4 parts water
- Medium wash: 1 part paint to 1 or 2 parts water
- Stronger wash: roughly equal parts paint and water
These are test ratios, not commandments carved into a pine tablet.
A very thin mixture gives you more visible grain and easier layering. A stronger mixture provides faster color coverage but approaches conventional paint as opacity increases.
This Old House describes both 1:1 whitewash mixtures and other decorative color-wash approaches with different dilution levels, while Sherwin-Williams recommends watered-down layers as a way to create subtle tinting effects. The common lesson is more important than any single ratio: test the transparency before committing to the entire piece.
Step-by-Step Color Washing Paint Technique
Step 1: Make a Sample Board
Use leftover wood of the same species whenever possible. Apply your wash exactly as you intend to apply it to the project.
Then let it dry.
This matters because wet color often looks richer and darker than dry color, and a clear protective finish can change its appearance again. Minwax similarly recommends testing stains and finishes on sample material because the final topcoat can alter the perceived depth and warmth of the color.
Step 2: Work in Small Sections
Do not coat an entire eight-foot tabletop and then begin looking for your rag.
Instead, work in manageable areas so you can wipe the wash while it remains workable.
Step 3: Brush With the Grain
Load the brush lightly and spread the mixture along the direction of the wood grain. Keep the layer thin and relatively even.
If you want a rustic finish, perfection is unnecessary. Minor variations can actually improve the handcrafted appearance.
Step 4: Wipe Off Excess
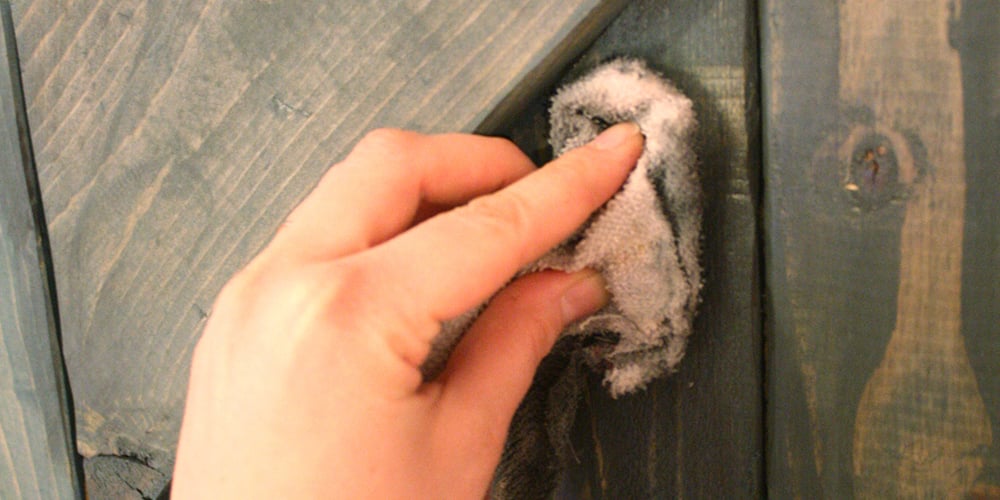
Before the wash becomes tacky, wipe the surface with a clean lint-free rag.
Wiping removes pigment from higher areas while leaving some color behind in pores and texture. More wiping reveals more wood. Less wiping produces stronger color.
This wipe-back principle is central to several grain-preserving finishing systems and is widely used in whitewashing, staining, and color-wash techniques.
Step 5: Let It Dry
Do not judge the final result while the surface is still wet. Allow it to dry according to the coating manufacturer’s directions.
Step 6: Build Color With Additional Thin Coats
If the first coat is too subtle, apply another light wash instead of immediately reaching for undiluted paint.
Several translucent coats provide much better control than one heavy coat. You can stop the moment the balance between color and grain looks right.
Choosing Colors That Highlight Wood Grain
White and Cream
White washes create a relaxed coastal, cottage, farmhouse, or Scandinavian look. They are particularly attractive when you want to brighten wood without making it look completely painted.
Gray
A soft gray wash can reduce orange or yellow tones in some woods and create the appearance of naturally weathered lumber.
Blue
Muted blue looks excellent on furniture, especially when brown grain remains visible underneath. Dark blues can feel surprisingly sophisticated rather than rustic.
Green
Sage, olive, and eucalyptus tones work beautifully with warm woods because the color and natural brown grain complement each other.
Black or Charcoal
A highly diluted charcoal finish can create striking modern furniture while preserving enough grain to prevent the surface from looking flat.
For intensely colored wood with maximum clarity, transparent wood dyes are another option. Woodworking references note that dyes can add substantial color without masking the figure as heavily as pigment-rich coatings.
Best Woods for a Visible-Grain Color Wash
Oak
Oak is practically begging for this treatment. Its strong, open grain remains highly visible, especially when pigment settles into its pores.
Ash
Ash also has pronounced grain and can create dramatic contrast beneath pale or colored washes.
Pine
Pine offers plenty of rustic charm but can absorb color unevenly. Testing is especially important.
Maple and Birch
These tighter-grained woods can be beautiful but may not produce the bold pore definition seen in oak. Some species also have a reputation for uneven staining, so sample boards are your best friends.
Reclaimed Wood
Weathering, saw marks, dents, nail holes, and irregular grain can become features rather than defects under a translucent wash.
If the board already looks like it has survived three barns, two storms, and an argument with a tractor, color wash may turn that history into decoration.
Common Color Washing Mistakes
Using Too Much Paint
If you cannot see the grain, you have crossed from washing into painting. Wipe more away or use a thinner mixture on the next coat.
Waiting Too Long Before Wiping
Once diluted paint begins becoming tacky, wiping can create streaks and patches instead of a natural wash.
Skipping the Test Piece
The identical wash can appear very different on oak, pine, maple, and previously stained wood.
Working Across Too Large an Area
Large sections increase the chance of lap lines and dried edges. Break large tabletops, doors, and wall panels into logical sections.
Over-Sanding Between Color Layers
A thin wash contains relatively little pigment. Aggressive sanding can remove most of your carefully applied color in seconds.
Applying an Incompatible Clear Coat
Always confirm compatibility and required drying time before adding a topcoat. A clear finish can also shift color slightly, so include it when making your sample board.
Should You Seal Color-Washed Wood?
Decorative objects that receive little handling may need minimal protection, depending on the coloring product used. Furniture, doors, shelves, tabletops, and cabinets usually benefit from an appropriate protective coating.
A water-based clear finish is popular when maintaining the original color is important because water-based finishes generally add less amber coloration than many oil-based finishes. Popular Woodworking notes that oil-based finishes tend to add a yellow-to-orange cast, whereas water-based finishes contribute relatively little color.
Wax can also create an attractive low-sheen furniture finish, although its protection level and maintenance requirements differ from film-forming clear coatings.
Choose your final protection according to how the object will actually be used. A decorative frame and a breakfast table do not live equally dangerous lives. One encounters dust. The other encounters coffee, spaghetti sauce, elbows, homework, hot plates, and possibly toddlers.
My Experience Using Color Washing While Keeping the Wood Grain Visible
The first lesson I learned from experimenting with color washes was that the mixture in the cup tells you almost nothing about how the finished wood will look. A wash that seems absurdly watery can produce surprisingly strong color once it enters the pores of raw wood.
My preferred approach is therefore to begin much more transparent than I think I need. Adding another coat is easy. Removing an overly opaque coat is where a relaxing afternoon project suddenly starts requesting sandpaper, coffee, and emotional support.
On pine, I found that preparation mattered more than expected. One board accepted a gray wash beautifully while another section became noticeably darker around knots and softer grain. Instead of fighting those variations, I began treating them as part of the look. For a farmhouse shelf or reclaimed-style project, controlled inconsistency often feels more authentic than perfectly uniform color.
Oak was almost the opposite experience. Its grain did most of the design work for me. A light white wash settled into the open pores, and after I wiped the flat surface, the grain appeared more pronounced than it had before coloring. This is one reason open-pore woods work so well with limed, cerused, whitewashed, and color-washed effects. WOOD Magazine similarly notes that white pigment in liming wax can emphasize pores in woods such as oak and ash.
I also discovered that the wiping rag is just as important as the brush. The brush gets the color onto the wood, but the rag determines the personality of the finish.
A gentle pass leaves plenty of color. Firm wiping produces a cleaner, more contemporary appearance. Wiping selective areas harder than others creates a worn, aged effect. Corners, grooves, carvings, and recessed details naturally retain additional pigment, so you can create impressive dimension without learning any complicated faux-finishing tricks.
Another useful experiment involved applying blue-gray wash over wood that already had a warm brown tone. I expected the combination to become muddy. Instead, using a very thin blue layer created a subdued weathered color while the warm grain continued showing through. The contrast made the finish look much more complex than the amount of work involved.
The biggest mistake I made was attempting to cover a large surface too quickly. I brushed wash across almost an entire tabletop before wiping it. By the time I returned to my starting point, part of the wash had already begun setting. The result was a collection of overlap marks that looked less like artisan furniture and more like a map of unexplained weather systems.
Working in smaller zones immediately solved the problem.
Another lesson was to inspect the piece from several angles before applying a second coat. Grain can disappear when viewed straight on but become clearly visible under side lighting. Since translucent finishes interact strongly with texture and reflected light, evaluating the piece in the room where it will be used is more useful than staring at it beneath harsh workshop lighting.
Finally, I learned to stop sooner.
That sounds simple, but it may be the most important color-washing skill. When a surface looks good after one coat, there is always a temptation to add another because perhaps it could look even better. Sometimes it does. Sometimes that second coat hides exactly the grain you were trying to preserve.
If the objective is visible wood grain, the wood should remain an active part of the design. Color is there to enhance it, not defeat it.
Final Thoughts
The color washing paint technique for keeping wood grain visible is one of the easiest ways to transform ordinary wood without sacrificing its natural character. Instead of choosing between bare wood and completely painted furniture, you can have both color and texture.
Start with a clean, properly prepared surface. Use a translucent coloring system compatible with your project. Test before committing. Apply thin layers, work in small sections, wipe strategically, and allow each coat to dry before deciding whether you really need another.
Most importantly, let the wood participate.
Knots, growth rings, pores, dents, and irregularities are exactly what separate real wood from a perfectly smooth manufactured surface. A successful color wash does not apologize for those features. It gives them better lighting.
Note: This article synthesizes practical finishing principles from reputable U.S. paint manufacturers, home-improvement publishers, woodworking publications, and finishing-product manufacturers. Product-specific directions should always take precedence when using a commercial coating.