Some front doors say, “Welcome.” Others say, “Please ignore the pile of delivery boxes beside me.” Then there are doors dressed with a cheerful floral wreath that practically waves at everyone who walks t third category.
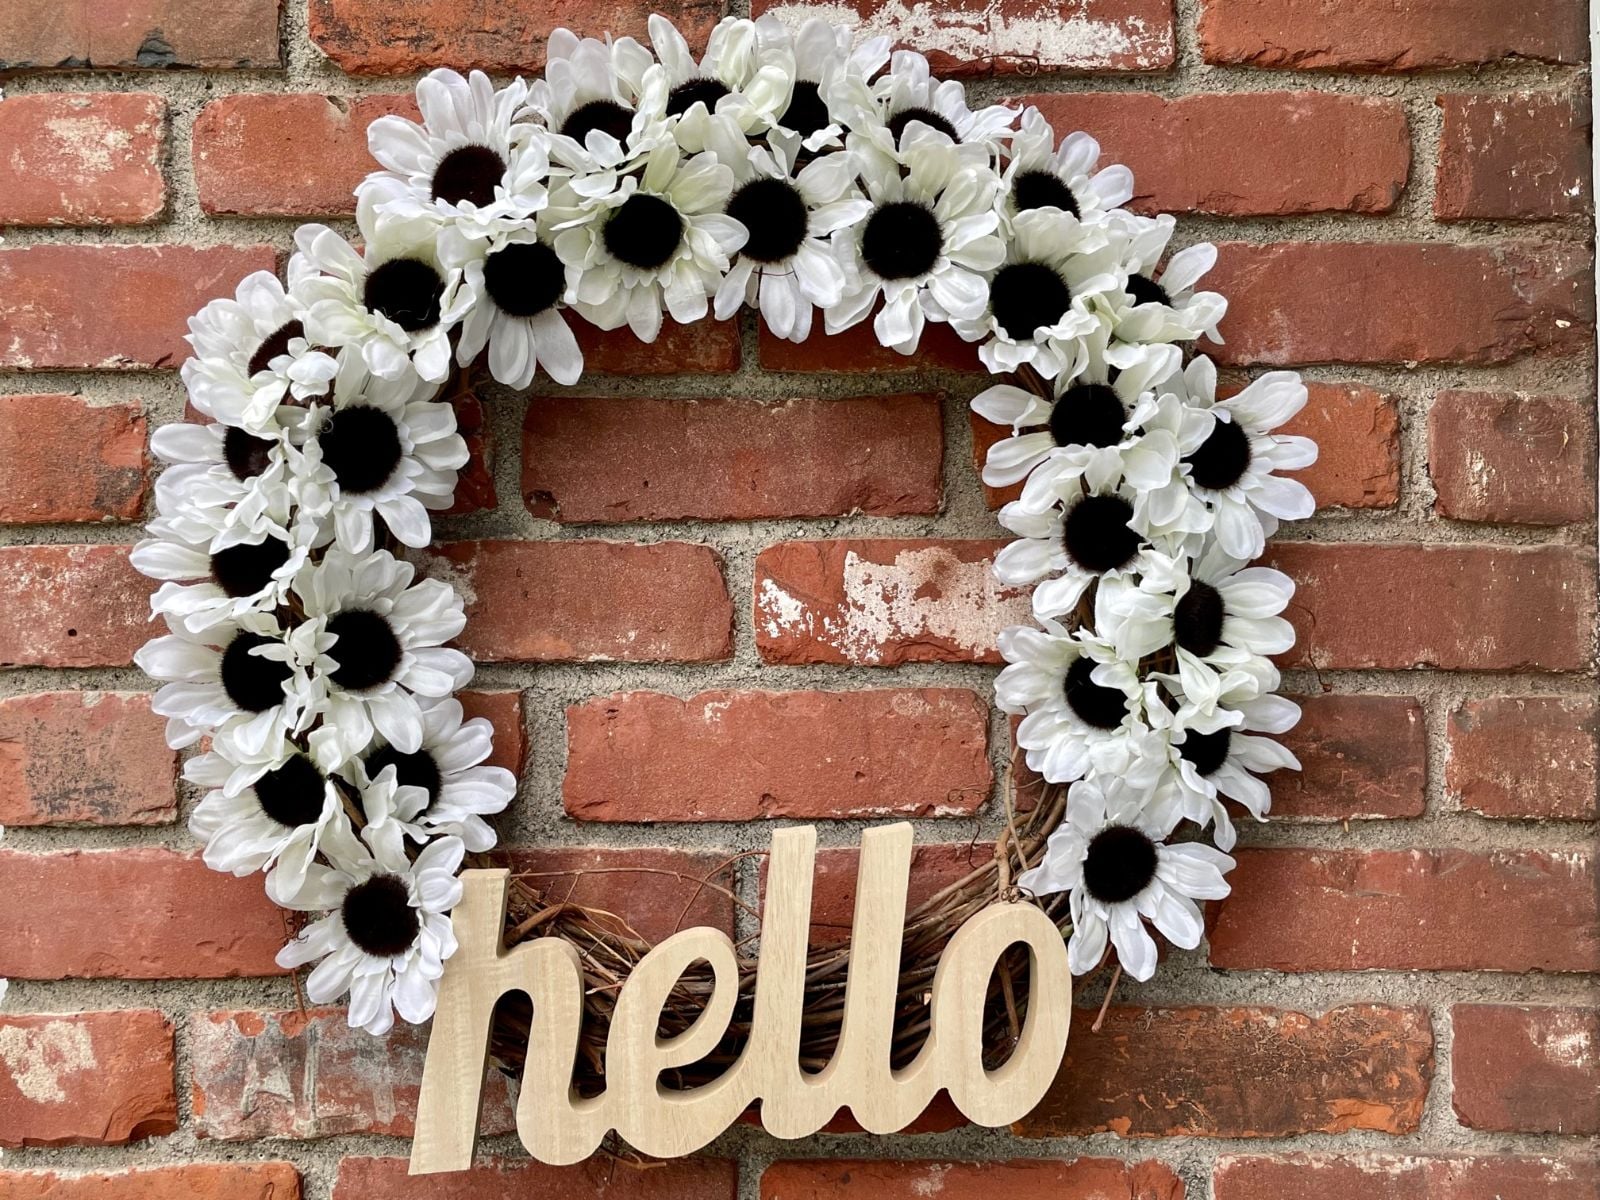
With a rustic grapevine wreath, a wooden “Hello” sign, jute twine, and a happy collection of artificial flowers, you can create charming front door decor without treating your credit card like a crafting casualty. The basic project is approachable for beginners, flexible enough for experienced DIYers, and surprisingly easy to customize.
Best of all, a handmade hello wreath does not need to look homemade in the “my glue gun and I had a disagreement” sense. A little planning, balanced flower placement, and careful attachment can produce a polished piece that fits farmhouse, cottage, casual, spring, summer, or everyday home decor.
Why a DIY Dollar Tree Hello Wreath Is Such a Cute Project
Wreath making has one glorious advantage over many DIY projects: the base already has a shape. You are not measuring lumber, checking whether a wall is square, or wondering why the instructions contain seventeen screws but your package contains sixteen. You start with a circle and make it prettier.
A grapevine wreath is especially forgiving. Its woven branches provide natural texture, and small imperfections become part of the rustic look. The gaps between vines also give you useful places to tuck stems, thread jute, and secure decorative pieces.
Adding a wooden “Hello” cutout turns a basic floral wreath into a friendly piece of front door decor. The word becomes a clear focal point while the flowers soften the design. It is a simple combination, but simple is often exactly what works.
Budget-friendly materials leave room for creativity
Dollar-store craft supplies are useful because you can experiment without feeling as though every misplaced flower has damaged a priceless museum artifact. Faux flowers, jute twine, wooden word signs, ribbon, and seasonal embellishments can all become parts of a personalized design.
Inventory naturally changes, so think of the material list as a blueprint rather than a sacred scroll. No white sunflowers? Try daisies. No “Hello” sign? A “Welcome,” “Home,” or seasonal word can work. The goal is to preserve the visual formula: textured wreath base, clear focal word, and coordinated floral accents.
Supplies for a Dollar Tree Hello Wreath with Flowers
For a classic version inspired by the charming floral design, gather the following materials:
- An approximately 18-inch grapevine wreath form
- A wooden “Hello” word cutout
- Artificial white sunflowers or similar faux flowers
- Jute twine
- A hot glue gun
- Hot glue sticks
- Scissors
- Wire cutters
- Optional floral wire
- Optional ribbon, greenery, or seasonal embellishments
Several bunches of faux flowers will give you enough blooms to experiment with coverage. The exact quantity depends on flower size and whether you want a full floral circle or an asymmetrical arrangement.
Before gluing anything, place every supply on your table and plug in the glue gun somewhere that does not require its cord to perform an Olympic hurdle event across your workspace. Hot glue is wonderfully useful, but the metal nozzle deserves respect. Avoid touching it, and keep loose materials away from the heated tip.
How to Make a DIY Dollar Tree Hello Wreath
Step 1: Plan the design before reaching for glue
Place the grapevine wreath flat on your work surface. Position the wooden “Hello” sign across the wreath and rotate it until the word feels natural and readable.
This dry-layout stage is important. A common crafting mistake is permanently attaching the first attractive object in the first attractive position, only to discover five minutes later that nothing else fits. Hot glue has many talents. Undoing enthusiastic decisions is not always one of them.
Decide whether your flowers will cover most of the wreath or cluster around the word. For a fuller look, distribute flower heads around the circle. For a modern farmhouse style, concentrate flowers near one side or around the “Hello” sign and allow more grapevine texture to remain visible.
Step 2: Prepare the wooden Hello cutout
Cut two short pieces of jute twine, roughly 2 1/2 inches each. Turn the wooden word cutout face down.
Create a small twine loop near each end of the sign. On a typical “Hello” cutout, the back of the “H” and the area near the final “o” can provide useful attachment points. Apply hot glue to secure both ends of each short twine piece, forming two loops.
Let the glue set before pulling on the loops. The loops act like hidden anchors and allow the wooden word to be tied to the grapevine form instead of relying entirely on visible glue.
Step 3: Attach the Hello sign to the wreath
Cut two longer pieces of jute twine, approximately 5 inches each. Thread one piece through each loop on the back of the word sign.
Position “Hello” on the front of the grapevine wreath. Wrap the longer twine pieces around sturdy sections of grapevine and tie them securely on the back.
Turn the wreath around and check the front again. Make sure the word is level enough for your taste. Remember, this is rustic decor, not a suspension bridge. A tiny angle can look charming. A word hanging nearly upside down may be slightly too charming.
Once you like the position, tighten the knots and trim excess twine. You can add a small dab of hot glue to the knot if extra security is needed.
Step 4: Prepare the artificial flowers
Use wire cutters to separate the artificial flowers from their bunches. Depending on the construction of your floral stems, you may be able to pull individual flower heads from the plastic stems.
For this style of wreath, individual flower heads create a full, closely arranged appearance. If you prefer more dimension, leave a few short stems attached and tuck them into the grapevine.
Sort the flowers by size before arranging them. Large blooms act as visual anchors. Medium flowers create rhythm, while smaller blossoms or greenery are excellent for filling awkward gaps.
Even if every flower came from the same package, rotate the heads and gently shape the petals. Artificial flowers often emerge from storage looking as though they spent the journey arguing inside a cardboard box. A few seconds of fluffing can make a dramatic difference.
Step 5: Arrange flowers around the Hello sign
Start with a few flower heads close to the wooden word. These blooms visually connect the sign to the wreath rather than making it appear as though “Hello” accidentally landed on a grapevine circle.
Continue placing flowers around the form without gluing them immediately. Space the largest blossoms first. Then position medium blooms between them.
Step back from the table and look at the entire arrangement. Better yet, take a quick phone photo. A photograph often makes crowded areas and empty sections easier to notice.
Balanced does not necessarily mean perfectly symmetrical. In floral design, repeating colors and distributing visual weight can create harmony without making every side identical. Three flowers on the left do not legally require three matching flowers on the right.
Step 6: Glue the flowers into place
Once you are pleased with the arrangement, remove one flower at a time, apply hot glue to its base, and return it to the planned location.
Press the flower carefully against the grapevine until the adhesive begins to set. Work around the wreath slowly. Gluing one bloom at a time helps preserve your layout.
For heavier decorations or stems that refuse to cooperate, floral wire can provide extra support. Wrap the wire around a stem and a sturdy section of the wreath base, twist it at the back, and trim the excess with wire cutters.
After attaching all the flowers, hold the wreath upright. Inspect it from the front and slightly from each side. Fill visible gaps with smaller flowers, leaves, or short pieces of greenery.
Step 7: Clean up and let the wreath set
Hot glue strings are the glitter of the adhesive world. They appear everywhere and seem capable of multiplying when you turn away.
Remove obvious strings by hand after the glue has cooled. A little warm air can also help fine glue threads shrink and become less noticeable, but use caution around artificial materials and avoid excessive heat.
Allow all glued areas to set before hanging the wreath. Check the wooden sign, gently test larger flowers, and make sure no sharp wire ends are sticking out from the back.
How to Make the Floral Arrangement Look More Expensive
The price of a craft supply does not determine whether the final project looks stylish. Arrangement and editing usually matter more.
Choose a limited color palette
White sunflowers create a bright neutral design that works beautifully with natural brown grapevine. For additional color, select one or two supporting shades instead of using every flower color available.
For example, combine white flowers with soft sage greenery and pale pink accents. For summer, use white, sunny yellow, and leafy green. In fall, try cream, rust, and muted orange.
A controlled palette gives the eye somewhere to rest and helps inexpensive individual materials read as one intentional composition.
Vary the flower sizes
A wreath made entirely from identical flower heads can look flat. Mix large focal blooms with smaller blossoms or greenery when possible.
Think in layers. Large flowers establish the pattern. Medium pieces bridge the gaps. Tiny details soften edges and disguise attachment points. This method creates depth even when the supplies themselves are simple.
Leave some grapevine visible
You do not have to cover every inch. Grapevine is a decorative material, not an embarrassing structural secret.
Leaving exposed sections can make the arrangement feel lighter and more natural. It also emphasizes the farmhouse character of a grapevine flower wreath.
Easy Ways to Customize Your Hello Wreath
Create a spring version
Use pastel tulips, miniature roses, lavender-toned blossoms, or soft pink flowers. Add wispy greenery for a garden-inspired look.
Make a cheerful summer wreath
Choose bright sunflowers, daisies, or colorful wildflower-style stems. Lemon accents or a yellow ribbon can add extra energy without overwhelming the wooden greeting.
Design a fall Hello wreath
Replace the white flowers with burnt orange, cream, burgundy, and warm yellow blooms. Small faux berries or miniature pumpkins can become accent pieces.
Paint the wooden word
The natural wood cutout works well with farmhouse decor, but paint can completely change the personality of the wreath.
Try matte black for strong contrast, white for a light cottage look, or a color borrowed from your front door. A distressed finish can add vintage character, while metallic paint creates a more glamorous result.
Use a different greeting
“Hello” is friendly and versatile, but the same technique can support other wood words. “Welcome,” “Home,” a family name, or a short seasonal greeting can personalize the project.
Where to Hang Your DIY Floral Wreath
The front door is the obvious location, but it is far from the only option.
A decorative wreath can hang above an entryway table, on an interior door, over a large mirror, or as part of a gallery wall. It can also become an easy backdrop for a casual party, bridal shower, or spring gathering.
For outdoor display, a covered porch is generally the kinder environment for a handmade wreath. Artificial flowers and craft materials can experience fading or wear when constantly exposed to direct sunlight, heavy rain, and changing weather.
If outdoor durability is a priority, look for materials intended for exterior use and inspect adhesives and finishes periodically. Bringing the wreath inside during severe weather is not overly protective. It is simply good craft parenting.
Common DIY Wreath Mistakes and How to Avoid Them
Gluing before planning
Arrange first and attach second. A five-minute dry layout can prevent twenty minutes of peeling glue from a fake sunflower.
Using too many focal points
The wooden “Hello” word should be easy to see. Large ribbons, oversized flowers, multiple signs, and a parade of seasonal ornaments can compete for attention.
Pick a star. Let the other elements be the supporting cast.
Ignoring the back of the wreath
Sharp wire ends and bulky glue deposits can scratch a door. Before hanging your wreath, examine the back and bend or cover anything that could rub against the surface.
Filling every empty space
A little negative space is healthy. When you think the wreath needs three more flowers, try adding one and looking again.
Knowing when to stop is a crafting superpower. Sadly, craft stores do not sell it beside the ribbon.
My Experience Making a Hello Wreath with Budget Flowers
The first thing I learned while experimenting with a Dollar Tree flower wreath style is that the project looks almost ridiculously easy when all the supplies are sitting neatly on a table. A wreath. A word. Flowers. Glue. What could possibly go wrong?
Apparently, my initial flower arrangement could go wrong.
I began by placing blooms around the wreath one after another at perfectly even intervals. Technically, the spacing was excellent. Visually, however, the wreath looked like a floral clock. I half expected someone to ask why the sunflower at three o’clock was running late.
So I pulled the loose flowers off, stepped back, and started again. This time, I grouped a few blooms around the “Hello” sign and varied the spaces between the larger flowers. Immediately, the design felt less mechanical. Adding smaller pieces between the major blooms helped the eye travel around the wreath naturally.
The wooden word was another useful lesson. My instinct was to apply a heroic quantity of hot glue and stick it directly to the grapevine. I am glad I paused. Grapevine surfaces are wonderfully rustic but not conveniently flat. Using twine attachment points made it much easier to position the sign and adjust the angle before committing to the final arrangement.
I also discovered that flower preparation matters more than expected. Straight from the bunch, several faux blooms looked compressed and slightly tragic. Rotating the petals, separating layers, and shaping the flowers with my fingers made them appear fuller. It cost nothing and took only a few minutes.
My favorite part of the process was the point when the wreath suddenly stopped looking like a pile of supplies. Crafters know this moment. You attach one more flower, hold the project upright, and somehow the random objects on your desk have become decor.
Of course, I then spent another ten minutes moving a tiny leaf half an inch to the left. Artistic vision is a serious responsibility.
The project also reminded me why inexpensive DIY decor can be so satisfying. A ready-made floral wreath may be beautiful, but making one gives you control over the proportions, colors, and personality. My preference was to leave visible grapevine between sections of flowers. Someone who loves maximalist decor could happily cover almost the entire form.
I would also recommend hanging the wreath temporarily before declaring it finished. A design can look balanced on a horizontal craft table and slightly different when viewed vertically on a door. Once mine was hanging, I noticed one sparse area near the lower edge. A small flower and two greenery pieces fixed the problem.
Storage became part of my learning experience, too. Tossing a floral wreath into a crowded closet is an excellent way to turn three-dimensional flowers into botanical pancakes. I found it better to protect the wreath in a roomy container and avoid stacking heavy decorations on top.
Would I make another Hello wreath? Absolutely. In fact, the basic idea is dangerously adaptable. I can already imagine a yellow-and-white summer version, a rust-colored fall version, and a soft pink spring wreath. This is how craft storage expands. Nobody plans it. One day you own a glue gun; the next day an entire closet is emotionally committed to faux eucalyptus.
Most importantly, the project is beginner-friendly without being boring. There is enough structure to make the process approachable and enough creative freedom to make the result personal. Even small decisionsflower spacing, the angle of the word, exposed grapevine, or paint colorchange the final personality of the wreath.
That is the real charm of this DIY Dollar Tree Hello wreath with flowers. It is not complicated. It is simply a friendly, inexpensive craft that turns ordinary materials into a warm greeting for your home.
Final Thoughts: Say Hello to an Easy Front Door Makeover
A beautiful entryway update does not always require new furniture, professional landscaping, or a dramatic paint project. Sometimes a grapevine form, a wooden word, and a cheerful collection of faux flowers can provide the personality your front door was missing.
This DIY Dollar Tree Hello wreath combines approachable wreath-making techniques with affordable materials and nearly endless customization options. Keep it neutral with white sunflowers, change the floral palette for each season, paint the wooden sign, or add a small ribbon accent.
Plan the arrangement before gluing, use flower sizes strategically, check the wreath while it is hanging, and stop decorating before every square inch becomes involved in the conversation. The result can be charming, welcoming, and unmistakably yours.
Now say hello to your new wreathand possibly goodbye to your last free shelf in the craft closet.
Note: Dollar-store product selection can vary by store and season. Use the listed materials as a flexible design guide and substitute similar wreath forms, wooden words, or artificial flowers when needed.