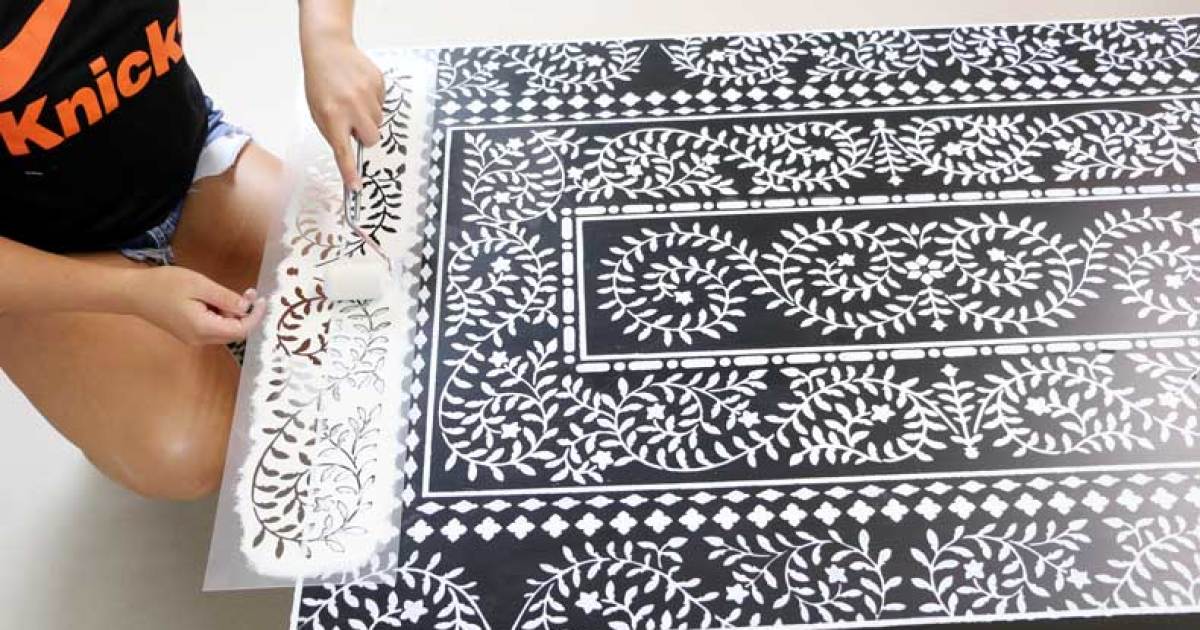
An Ikea coffee table is a lot like plain toast: practical, affordable, and perfectly fine until you realize it could be wearing jam, butter, cinnamon, and possibly a tiny crown. That is where an inlay stencil kit enters the living room with the confidence of a makeover show host holding a paint roller.
If your coffee table is one of those simple, clean-lined Ikea pieces that quietly does its job under remotes, mugs, books, and mysterious crumbs, you do not need to replace it. You can upgrade it. With the right prep, a decorative stencil, a little paint, and a protective finish, a basic table can look like a boutique piece inspired by bone inlay, Moroccan tile, coastal cottage furniture, or vintage hand-painted decor.
The best part? This DIY coffee table makeover does not require master carpentry, a garage full of intimidating tools, or the emotional strength needed to assemble a 17-drawer dresser. An inlay stencil kit gives you the pattern. Your job is to prepare the surface, apply the design carefully, seal it well, and accept compliments with a humble but slightly smug smile.
Why an Ikea Coffee Table Is Perfect for a Stencil Makeover
Ikea coffee tables are popular because they are simple, lightweight, and easy to style. Models such as the LACK coffee table are especially friendly to DIY projects because the flat tabletop provides a wide, uninterrupted surface. That blank space is exactly what makes it feel bland in some rooms, but it is also what makes it a perfect canvas for an inlay stencil kit.
Many Ikea tables use engineered materials such as particleboard, fiberboard, paper foil, acrylic paint, melamine foil, or other manufactured surface finishes. In normal human language, that means the table may not behave like raw wood. Paint will not automatically grip the surface just because you asked nicely. Smooth laminate-style finishes need cleaning, light sanding, and primer before decorative paint has a real chance of staying put.
That said, this is not a flaw. It is simply the rule of the game. Once you understand the surface, the project becomes much easier. A well-prepped Ikea coffee table can handle a painted stencil design beautifully, especially when you protect the finished work with a clear topcoat.
What Is an Inlay Stencil Kit?
An inlay stencil kit is a reusable template designed to create the look of decorative inlay without actually cutting, carving, or embedding material into furniture. Traditional inlay can involve bone, mother-of-pearl, wood, metal, or stone. It is gorgeous, but it is also expensive and not exactly a casual Saturday project unless your Saturday includes artisan training and several specialized tools.
A stencil kit creates a similar visual effect with paint. The pattern may include floral vines, geometric borders, medallions, tile motifs, mandalas, Art Deco shapes, or delicate repeating lines. When used on a coffee table, it can make a flat surface look layered, detailed, and custom.
The phrase “inlay stencil” usually refers to the style of the pattern rather than the method. You are not adding real inlay; you are painting a faux inlay effect. That is good news for your budget, your sanity, and your coffee table, which probably did not sign up for surgery.
Best Design Ideas for an Ikea Coffee Table Inlay Makeover
Classic Black and Ivory
A black or black-brown Ikea coffee table with an ivory stencil pattern can look dramatic and expensive. This combination works well in modern, eclectic, bohemian, and traditional rooms. Use an allover stencil for a bold look or a border stencil if you want the table to feel elegant but not overly busy.
White Table With Navy or Charcoal Pattern
A white Ikea coffee table can become coastal, crisp, and designer-inspired with navy blue, slate gray, or charcoal stenciling. This is a great option for living rooms with blue pillows, woven baskets, pale rugs, or beachy decor that does not scream “I bought a wooden sign that says RELAX.”
Wood-Look Table With Soft Sage or Cream
If your table has a light wood effect, consider using a soft sage, warm white, muted terracotta, or dusty blue stencil. The result feels more handmade and less graphic. It is ideal for farmhouse, cottage, organic modern, and casual family rooms.
Metallic Accent Details
A tiny amount of gold, champagne, or bronze stencil paint can add glamor. The keyword here is tiny. Metallic paint is like hot sauce: exciting in the right amount, alarming when poured without supervision. Use metallics for border accents, corner details, or a central medallion.
Tools and Materials You Will Need
Before you begin, gather everything in one place. DIY confidence drops sharply when you are standing in wet primer trying to locate painter’s tape.
- Ikea coffee table
- Inlay stencil kit
- Mild cleaner or degreasing cleaner
- Microfiber cloths
- Fine-grit sandpaper, usually around 120 to 220 grit
- Tack cloth or clean dust-free cloth
- Painter’s tape
- Bonding primer made for slick or laminate surfaces
- Furniture paint, acrylic paint, or enamel paint
- Stencil brush, dense foam roller, or stencil sponge
- Small artist brush for touch-ups
- Clear protective topcoat in matte, satin, or gloss
- Drop cloth or old sheet
If your coffee table has chips, dents, or damaged corners, add wood filler or repair putty to the list. A stencil pattern can hide many sins, but it cannot magically flatten a crater left by a falling candleholder.
Step-by-Step: How to Use an Inlay Stencil Kit on an Ikea Coffee Table
Step 1: Clean the Table Thoroughly
Start by wiping the table with a mild cleaner to remove dust, oils, waxy residue, fingerprints, snack evidence, and anything else living on the surface. Pay special attention to the tabletop because that is where the stencil will go. After cleaning, wipe again with a damp cloth and let the table dry completely.
This step is boring, which means it is important. Paint does not stick well to grease or grime. If you skip cleaning, your beautiful stencil may eventually peel, chip, or flake off like it has suddenly remembered an urgent appointment elsewhere.
Step 2: Lightly Sand the Surface
Next, scuff-sand the tabletop and any areas you plan to paint. The goal is not to strip the surface down to bare material. In fact, with laminate-style or foil-covered furniture, sanding too aggressively can damage the thin surface layer. Use light pressure and sand just enough to dull the shine.
A fine-grit sandpaper around 120 to 220 grit usually works well for this kind of prep. After sanding, vacuum or wipe away the dust. Then use a tack cloth or clean microfiber cloth to pick up the final particles. Dust is the tiny villain of smooth paint finishes, and it loves to appear right when you thought you were done.
Step 3: Apply Bonding Primer
A bonding primer is one of the smartest choices for painting Ikea furniture. Smooth manufactured surfaces need help creating adhesion. Primer gives your paint something to grip and helps the final color look more even.
Apply a thin, even coat with a foam roller or quality brush. Avoid thick coats because they can create ridges, drips, and tacky spots. Let the primer dry according to the product instructions. If the surface still looks uneven or slick, apply a second light coat. For an extra-smooth finish, lightly sand the dry primer with fine-grit sandpaper and wipe away the dust before painting.
Step 4: Paint the Base Color
Now apply your base color. This may be black, white, navy, cream, green, or any shade that fits your room. For a high-use coffee table, choose a durable furniture paint or enamel-style paint. Thin coats are better than thick coats. Two light coats usually look smoother and last longer than one heavy coat that resembles frosting applied during an earthquake.
Let each coat dry fully before adding the next. If the paint brand recommends sanding between coats, do it gently and remove all dust afterward. Patience here pays off later.
Step 5: Plan the Stencil Placement
Before opening the paint, lay the stencil on the tabletop and test different placements. Center medallions, border designs, corner motifs, and allover patterns each create a different feeling. Use painter’s tape to mark the center point and keep the stencil aligned.
If your stencil repeats, check how the edges line up before you begin. A repeating pattern can look professional when aligned carefully, but it can look like a visual hiccup if the rows drift. Measure twice, tape once, and do not trust your eyeballs after midnight.
Step 6: Use a Dry Stenciling Technique
The biggest secret to crisp stencil lines is using very little paint. Dip your stencil brush, sponge, or foam roller into the paint, then offload most of it onto a paper towel. The tool should feel almost dry. This may seem wrong at first, but it prevents paint from bleeding under the stencil edges.
Use a light tapping or swirling motion with a stencil brush, or roll gently if using a foam roller. Do not press hard. Heavy pressure forces paint underneath the stencil, creating fuzzy lines. The table is not a pancake, and the roller is not a spatula.
Step 7: Lift, Move, and Repeat Carefully
After completing one section, lift the stencil straight up rather than sliding it. Sliding can smear the design. If you are repeating the pattern, wait briefly for the paint to settle, then reposition the stencil according to the registration marks or pattern edges.
Keep a small damp cloth nearby for quick cleanup. If you catch a mistake immediately, you may be able to wipe it away. If it dries, let it dry fully and correct it later with your base color and a small artist brush.
Step 8: Add Details and Touch-Ups
Once the stencil paint is dry, step back and inspect the table from normal viewing distance. Do not judge it with your nose two inches from the surface unless you plan to serve coffee that way. Small imperfections often disappear in the overall pattern.
Use a fine brush to sharpen edges, fill missing spots, or clean up small bleeds. You can also lightly distress the stencil for a vintage look, but do this gently. A little distressing says “collected antique.” Too much says “survived a raccoon incident.”
Step 9: Seal the Table With a Clear Topcoat
A coffee table works hard. It holds drinks, books, feet, laptops, board games, and occasionally dinner when the sofa wins over the dining table. For that reason, a clear topcoat is not optional if you want your stencil design to last.
Choose a water-based polyurethane, furniture lacquer, or durable clear coat compatible with your paint. Apply thin coats and let each coat dry as directed. Satin is a popular choice because it offers a subtle sheen and hides minor imperfections better than high gloss. Matte can look modern, while gloss adds drama but shows flaws more easily.
After the final coat, give the table time to cure before heavy use. Dry-to-the-touch does not always mean fully hardened. Use coasters, avoid dragging decor across the surface, and resist the urge to test durability with your keys. The table has been through enough.
Common Mistakes to Avoid
Skipping the Primer
Skipping primer on slick Ikea furniture is one of the fastest ways to create a finish that looks good for a week and then starts behaving badly. Primer improves adhesion and helps paint last longer, especially on laminate-style surfaces.
Using Too Much Stencil Paint
Paint bleed happens when the brush or roller is overloaded. For stenciling, less paint is almost always better. Build color gradually instead of trying to get full coverage in one pass.
Not Sealing the Finished Design
A decorative coffee table without a topcoat is vulnerable to scratches, rings, and everyday wear. A protective finish helps preserve the pattern and makes the surface easier to clean.
Choosing a Pattern That Fights the Room
An inlay stencil should add personality, not start a design argument with your rug, pillows, curtains, and wall art. If your room already has several bold patterns, choose a simpler stencil or a tone-on-tone color scheme.
How to Style Your Newly Stenciled Coffee Table
Once your Ikea coffee table makeover is finished, let the pattern shine. A stenciled tabletop already brings visual detail, so you do not need to cover it with a mountain of decor. Try a small tray, a stack of books, a candle, and one natural element such as a plant or bowl of stones.
If the stencil is bold, keep accessories simple. If the stencil is subtle, you can add more contrast with brass, ceramic, glass, or woven textures. The goal is to make the table look styled, not buried under objects like it is hiding from creditors.
Use coasters to protect the surface, especially during the first few weeks after sealing. Even a durable finish benefits from basic care. Wipe spills promptly with a soft damp cloth and avoid harsh cleaners that could dull or damage the topcoat.
Budget-Friendly Variations
If you want the inlay look without spending much, start with a small stencil for the corners or center instead of a full tabletop kit. You can also stencil only the lower shelf of a coffee table for a hidden detail that appears from certain angles. Another option is to paint the table legs one color and stencil the top in a coordinating shade.
For a renter-friendly mindset, stick with classic color combinations that will work in future rooms: black and white, navy and cream, gray and ivory, or warm beige and soft white. Trendy colors are fun, but a coffee table usually lives through several pillow changes, at least one rug crisis, and multiple “I’m going minimalist now” declarations.
Experience Notes: What This Ikea Coffee Table Project Teaches You
The biggest lesson from transforming an Ikea coffee table with an inlay stencil kit is that the final result depends heavily on what happens before the pretty part. Most people get excited about the stencil design, and that makes sense. The pattern is the star. It is the dramatic reveal. It is the moment when a plain table starts acting like it came from a charming boutique where everything smells faintly of sandalwood.
But the quiet prep steps are what make the makeover last. Cleaning, sanding, priming, and letting coats dry are not glamorous, but they are the difference between a table that looks custom and one that starts chipping before the next season of your favorite show drops. In real-life DIY projects, rushing is usually the most expensive shortcut. You save an hour today, then spend three hours later fixing peeling paint while questioning your life choices.
Another useful experience is learning how little paint a stencil actually needs. Beginners often load the brush like they are painting a fence. Then the paint bleeds under the stencil, the delicate pattern turns blurry, and suddenly the “bone inlay” look becomes “abstract emotional weather map.” The nearly dry brush technique feels slow, but it gives cleaner lines and more control. It is better to build the color gradually than to flood the stencil in one heavy pass.
You also learn that perfection is not the same as charm. Hand-painted furniture has tiny variations. A slightly uneven edge or a small touch-up spot does not ruin the piece. In fact, it can make the table feel less factory-made and more personal. The trick is knowing which imperfections matter. A huge smear in the center needs correction. A microscopic wobble in a corner probably needs you to step away, drink water, and stop inspecting your furniture like a detective in a crime drama.
Color choice is another experience that matters more than expected. A high-contrast stencil creates instant drama, but it also demands attention. A tone-on-tone stencil feels quieter and more sophisticated. For a first project, many DIYers find that a soft contrast is easier to live with. Cream over warm gray, ivory over navy, or pale sage over white can deliver the inlay effect without making the coffee table shout across the room.
Finally, this project teaches confidence. Once you successfully upgrade one simple Ikea piece, you start seeing possibilities everywhere. A side table looks stencil-ready. A cabinet door begins whispering, “What about me?” A plain tray suddenly seems underdressed. That is the danger and joy of DIY furniture makeovers: they train your eye to see potential instead of replacement. Your coffee table is no longer just a place for mugs. It becomes proof that affordable furniture can look thoughtful, stylish, and completely your own with a stencil kit, patience, and a weekend’s worth of creative energy.
Final Thoughts
An Ikea coffee table does not have to stay plain forever. With an inlay stencil kit, good surface preparation, careful painting, and a durable topcoat, you can turn a simple budget table into a statement piece with personality. Whether your style leans boho, classic, coastal, modern, or vintage-inspired, the right stencil pattern can make your living room feel more finished without requiring a full furniture replacement.
The project is affordable, creative, and forgiving when approached with patience. Clean the surface, scuff it lightly, prime it properly, stencil with a nearly dry brush, seal the design, and give the finish time to cure. Do that, and your once-bland Ikea coffee table may become the piece guests ask about first. Just be prepared: after the first compliment, you may begin casually saying things like, “Oh, that? I made it,” with the calm confidence of someone who owns painter’s tape in multiple widths.