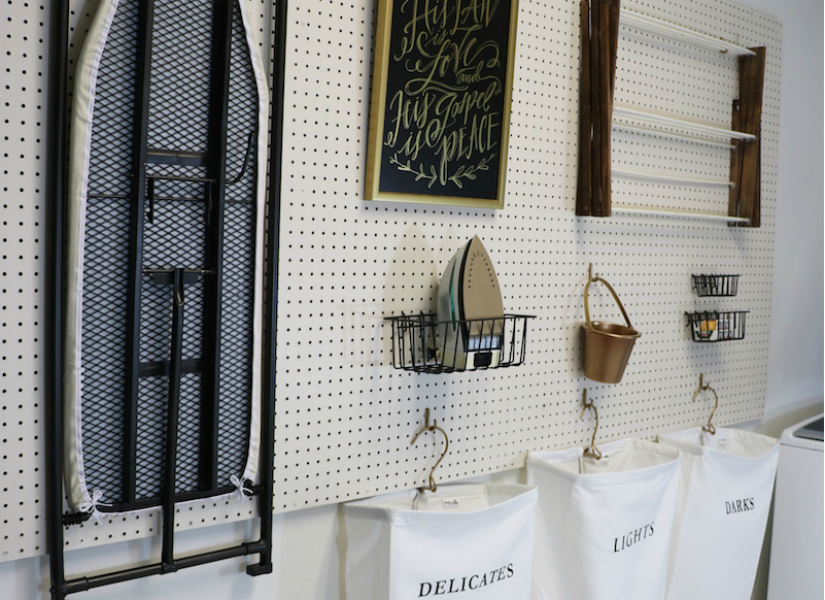
A laundry room can become cluttered with impressive speed. One minute, it contains a washeminute, it looks as though every cleaning product in the house has gathered there for a convention.
Instalspace. Instead of sacrificing your countertop to lint rollers, stain removers, brushes, clothespins, and lonely socks awaiting reunification, you can move everyday supplies onto the wall. The result is flexible, visible, and easy to rearrange whenever your laundry routine changes.
This guide explains how to hang pegboard securely, choose the right material, create space for hooks, and design a practical laundry room storage system. It also covers common mistakes and real-world lessons that can save you from crooked panels, loose hooks, and the classic DIY question: “Why did I not measure that first?”
Why Pegboard Works So Well in a Laundry Room
Pegboard uses empty vertical space without requiring bulky cabinets. Hooks, baskets, shelves, clips, and tool holders can be moved from hole to hole, so the storage layout is not permanently locked in place.
That flexibility matters in a laundry room. A family may initially need space for baby-clothing stain treatments and later want that same area for pet-care supplies, sewing tools, or reusable cleaning cloths. With pegboard, changing the setup takes minutes rather than another round of drilling and patching.
Wall-mounted storage also keeps the floor and work surfaces clearer. Frequently used supplies remain visible, while baskets can contain smaller items that would otherwise roll behind the dryer and enter another dimension. Organizing experts regularly recommend using underused wall space, grouping similar supplies, and placing everyday items within easy reach. Best Pegboard Material
Before buying a panel, consider moisture, expected weight, appearance, and accessory compatibility. The least expensive board is not always the best value if it swells, rusts, or refuses to work with the hooks you already own. Traditional hardboard pegboard is affordable, widely available, and easy to cut with common woodworking tools. It can also be primed and painted to coordinate with cabinets or walls. Standard hardboard is best for a reasonably dry, ventilated laundry room. If the room becomes humid or experiences occasional splashes, seal the front, back, cut edges, and holes with an appropriate primer and durable paint. Unsealed fiber-based panels may weaken after repeated moisture exposure. Powder-coated steel pegboard is strong, easy to wipe clean, and well suited to heavier accessories. It is a good choice for holding an iron, compact steamer, small shelves, or several full baskets, provided the panel and mounting system are rated for those loads. Some metal systems accept standard pegboard hooks, while others use proprietary slotted accessories. Check compatibility before purchasing a heroic collection of hooks that fit absolutely nothing. Plastic pegboard resists moisture and is lightweight, making it useful near utility sinks or in humid rooms. Many plastic panels include molded spacers, eliminating the need for separate wood furring strips. Plastic systems may have lower load limits than steel, so review the manufacturer’s specifications. They are generally excellent for clothespins, brushes, lint rollers, mesh bags, gloves, and small containers. Home-improvement guidance commonly identifies hardboard, metal, and plastic as the main choices and recommends considering humidity, electrical conditions, cutting requirements, and anticipated weight before installation. aterials
Your exact shopping list will depend on the selected system, but a conventional hardboard installation usually requires: Do not choose fasteners by appearance alone. The correct screw length and anchor type depend on the wall, panel, frame thickness, and expected load. When storing anything heavy, fastening the supports into wall studs is preferable to relying only on drywall anchors. Look for an open wall above a folding counter, beside the washer, behind a door, or next to a utility sink. Make sure the panel will not block appliance lids, cabinet doors, plumbing shutoff valves, dryer vents, electrical panels, or outlets that need regular access. Leave adequate clearance from hot appliance surfaces and exposed electrical components. A metal panel should not be positioned where it could contact unsafe wiring. Use painter’s tape to outline the proposed panel on the wall. This simple preview helps you judge whether the pegboard feels proportional and whether frequently used items will be reachable. Measure appliance doors in both open and closed positions. A detergent basket may look perfectly placed until the washer lid rises and launches it toward the ceiling. Use a stud finder to identify framing behind the drywall. Mark stud centers slightly above and below the planned pegboard area so the marks remain visible while the panel is being positioned. Also check for plumbing and electrical lines before drilling. Laundry rooms contain more hidden utilities than an ordinary hallway wall, so careless drilling can turn a storage project into an emergency repair project. Place the pegboard flat on the floor and arrange the items you expect to store. Create zones based on tasks: Keep the items you use every week between waist and eye level. Reserve high positions for lightweight backups and lower positions for safe, nonhazardous supplies. Measure twice and mark the cut line with a straightedge. Support the panel fully while cutting so it does not flex or tear near the final inches. For hardboard, a circular saw or jigsaw with a suitable blade is usually effective. Covering the cut line with painter’s tape can help reduce surface chipping. Wear eye protection and follow the tool manufacturer’s safety instructions. After cutting, lightly sand rough edges. Test-fit the panel against the wall before painting or building the support frame. If you plan to paint hardboard, finish both faces and every exposed edge. Painting only the front leaves the back and cut edges more vulnerable to moisture. Use a thin roller or spray application to avoid filling the holes. If paint collects inside them, clear the openings before the coating fully hardens. A satin or semi-gloss finish is generally easier to wipe clean than a flat finish. Allow the paint to cure fully. A surface that feels dry may still be soft enough for hooks to scratch it. Traditional pegboard hooks extend through the holes and project behind the panel. Therefore, standard hardboard cannot normally be screwed tightly against drywall. It needs an air gap created with furring strips, stand-off spacers, or an integrated mounting frame. Install vertical furring strips along the left and right edges and add intermediate supports where required. Large panels may also benefit from horizontal supports. Position the strips so they support panel edges without covering the holes needed for accessories. Installation guides from major U.S. home-improvement sources consistently recommend leaving space behind standard pegboard and securing furring strips or mounting supports to wall studs whenever possible. ach the Furring Strips
Hold the first strip against a marked stud and check it with a level. Drill pilot holes when necessary, then drive appropriate screws through the strip, drywall, and into the stud. Install the remaining strips in the same manner. Check that their front faces sit in the same plane. A warped strip can cause the completed panel to bow. If no stud is available at a necessary support point, use a wall anchor rated for the wall material and total anticipated load. Never assume a tiny generic anchor can support a loaded shelf merely because its packaging contains a confident-looking illustration. Ask another person to help hold a large panel. Place the pegboard against the completed support frame and check the top and side edges with a level. Use temporary support blocks or a straight ledger board beneath the panel if you are working alone. This keeps the panel at the correct height while allowing you to position the first screws. Drive short screws with washers through pegboard holes and into the furring strips. The washers spread pressure around the holes and help prevent the fastener heads from pulling through the board. Begin at the upper corners, confirm that the panel remains level, and then add fasteners around the perimeter and through intermediate supports. Tighten each screw until the board is secure, but do not crush or deform the panel. Follow the panel manufacturer’s fastener spacing and load instructions. Metal and plastic systems may include brackets or proprietary screws that should be used instead of a homemade frame. Before loading the pegboard, press gently at several points. The panel should not rock, rattle, or pull away from the wall. Add accessories gradually. Start with lightweight items and inspect the fasteners after the first few days. If the board flexes or a support loosens, remove the load and correct the mounting problem. Simple hooks work well for lint rollers, scissors, dusters, handheld brushes, mesh laundry bags, and reusable shopping bags. Use retaining clips or peg locks to stop frequently handled hooks from lifting out with the item. Wire or plastic baskets prevent clothespins, dryer balls, stain pens, sewing supplies, and single-use laundry sheets from becoming visual confetti. Labeling the baskets makes it easier for everyone in the household to return items correctly. Pegboard shelves can hold jars, decorative containers, or lightweight supplies. Keep heavy detergent bottles on a counter, in a cabinet, or on shelving anchored independently into studs unless the pegboard system is specifically rated for that load. Mount several clips or a short line with clothespins for unmatched socks. It is practical, slightly optimistic, and considerably better than allowing individual socks to colonize the folding counter. A successful pegboard should not be filled simply because empty holes exist. Open space makes supplies easier to see and gives the system room to evolve. Current organization guidance similarly favors keeping frequently used items accessible rather than covering the board with rarely used objects. oard Installation Mistakes
Without a rear gap, conventional hooks cannot pass through and lock into position. Use furring strips, spacers, or a panel with built-in stand-offs. Unsealed hardboard can absorb moisture. Seal it thoroughly or choose plastic or coated metal for a damp room. The panel is only as dependable as the structure behind it. Whenever possible, attach supports to studs and follow rated-load instructions. A falling bottle can damage an appliance, spill into controls, or injure someone. Store large containers on stable shelving or in lower cabinets, and keep hazardous products away from children and pets. Do not cover water valves, electrical receptacles, drain connections, dryer ducts, service panels, or ventilation openings. Attractive storage is not worth making routine maintenance impossible. Matching glass jars may look lovely, but storage must first suit the products you actually use. Keep safety labels and instructions available, and never transfer chemicals into containers that could be mistaken for food or beverages. The most important lesson from planning a laundry pegboard is that installation is only half the project. The other half is understanding how people move through the room. A technically perfect panel can still be annoying if the detergent scoop is placed behind an open washer lid or the stain brush requires walking around a laundry basket every time a shirt meets spaghetti sauce. Before deciding where each accessory belongs, it helps to complete an imaginary load of laundry. Walk through sorting, treating stains, loading, transferring, drying, folding, and putting clothes away. Notice where your hands naturally reach. Items used at the beginning of the process should be close to the washer. Stain removers, mesh bags, and measuring accessories belong there. Dryer balls, lint tools, and delicate-drying clips should be closer to the dryer or hanging area. This sounds obvious, yet it is easy to become distracted by symmetry and arrange everything as though the laundry room were entering a beauty contest. Another lesson is to begin with fewer accessories than you think you need. A large assortment kit can be useful, but installing every hook immediately often produces clutter in pegboard form. Start with the items that currently occupy the counter. Give each one a logical home, then wait a week before adding more storage. That trial period reveals which hooks are too loose, which baskets are too deep, and which supplies are rarely touched. It may also reveal that two household members have entirely different ideas about where the lint roller belongs. Such discoveries are normal and considerably cheaper to fix on pegboard than inside custom cabinetry. Small baskets are particularly effective, but they need limits. A basket labeled “Laundry Tools” eventually becomes a mysterious cave containing safety pins, coupons, broken pencils, and one key nobody recognizes. Narrow categories such as “Clothespins,” “Stain Care,” and “Mending” are easier to maintain. Hook stability also matters more than expected. When an item is removed daily, an unsecured hook may come with it and land behind the appliance. Retaining clips, hook locks, or compatible accessories solve this problem. For frequently moved objects, test the removal motion several times before declaring the layout finished. Maintenance is simple but should not be ignored. Every few months, remove the accessories, wipe the panel, inspect the mounting screws, and check for moisture damage or rust. Laundry products sometimes leak slowly, leaving a sticky film that attracts dust and lint. Washable baskets or removable liners make cleanup easier. Finally, the best pegboard has some personality. A cheerful paint color, wood frame, small sign, or restrained decorative element can make the laundry room feel intentional rather than forgotten. Just avoid decorating every available inch. The goal is to create a storage system that helps you finish laundry fasternot a wall installation requiring its own weekly cleaning routine. Learning how to hang pegboard for laundry room storage is mostly a matter of planning the location, choosing moisture-appropriate materials, creating enough rear clearance for hooks, and fastening the supports securely. Once installed, the board can adapt to changing routines through movable hooks, baskets, shelves, and clips. Organize supplies by task, keep heavy products on properly supported surfaces, and leave room for future adjustments. With a thoughtful layout, even a narrow utility area can become an efficient laundry station where every brush, clothespin, and suspiciously single sock has a home. Note: Always follow the pegboard manufacturer’s mounting instructions and load limits. Check for hidden plumbing and electrical lines before drilling, and use fasteners appropriate for your wall construction.Tempered Hardboard Pegboard
Metal Pegboard
Plastic Pegboard
Plan the Laundry Room Pegboard Layout
Choose a Safe Location
Measure the Working Zone
Map the Wall Studs
Arrange Supplies Before Drilling
How to Hang Pegboard Step by Step
Step 1: Cut the Panel to Size
Step 2: Prime and Paint the Pegboard
Step 3: Build an Air Gap Behind the Panel
Step 5: Position the Pegboard
Step 6: Fasten the Panel
Step 7: Test the Installation
How to Organize the Pegboard for Perfect Storage
Use Hooks for Handled Items
Add Baskets for Small Supplies
Install Small Shelves Carefully
Create a Lost-Sock Station
Leave Some Holes Empty
Mounting Standard Pegboard Flat Against Drywall
Ignoring Laundry Room Humidity
Using Weak Fasteners
Storing Heavy Chemicals Over Appliances
Blocking Appliance Access
Designing for Photographs Instead of Real Life
Real-World Experience: What Makes a Laundry Pegboard Stay Useful
Conclusion